
Staircase Wall Paneling in the Inland Empire: What Goes Wrong and What to Decide Before the First Board Goes Up
By Brian Holland, Owner and Lead Carpenter, Holland & Sons Construction · Carpenter since 1991 · CSLB #1123738 · NARI Member · NAHB Member
Published
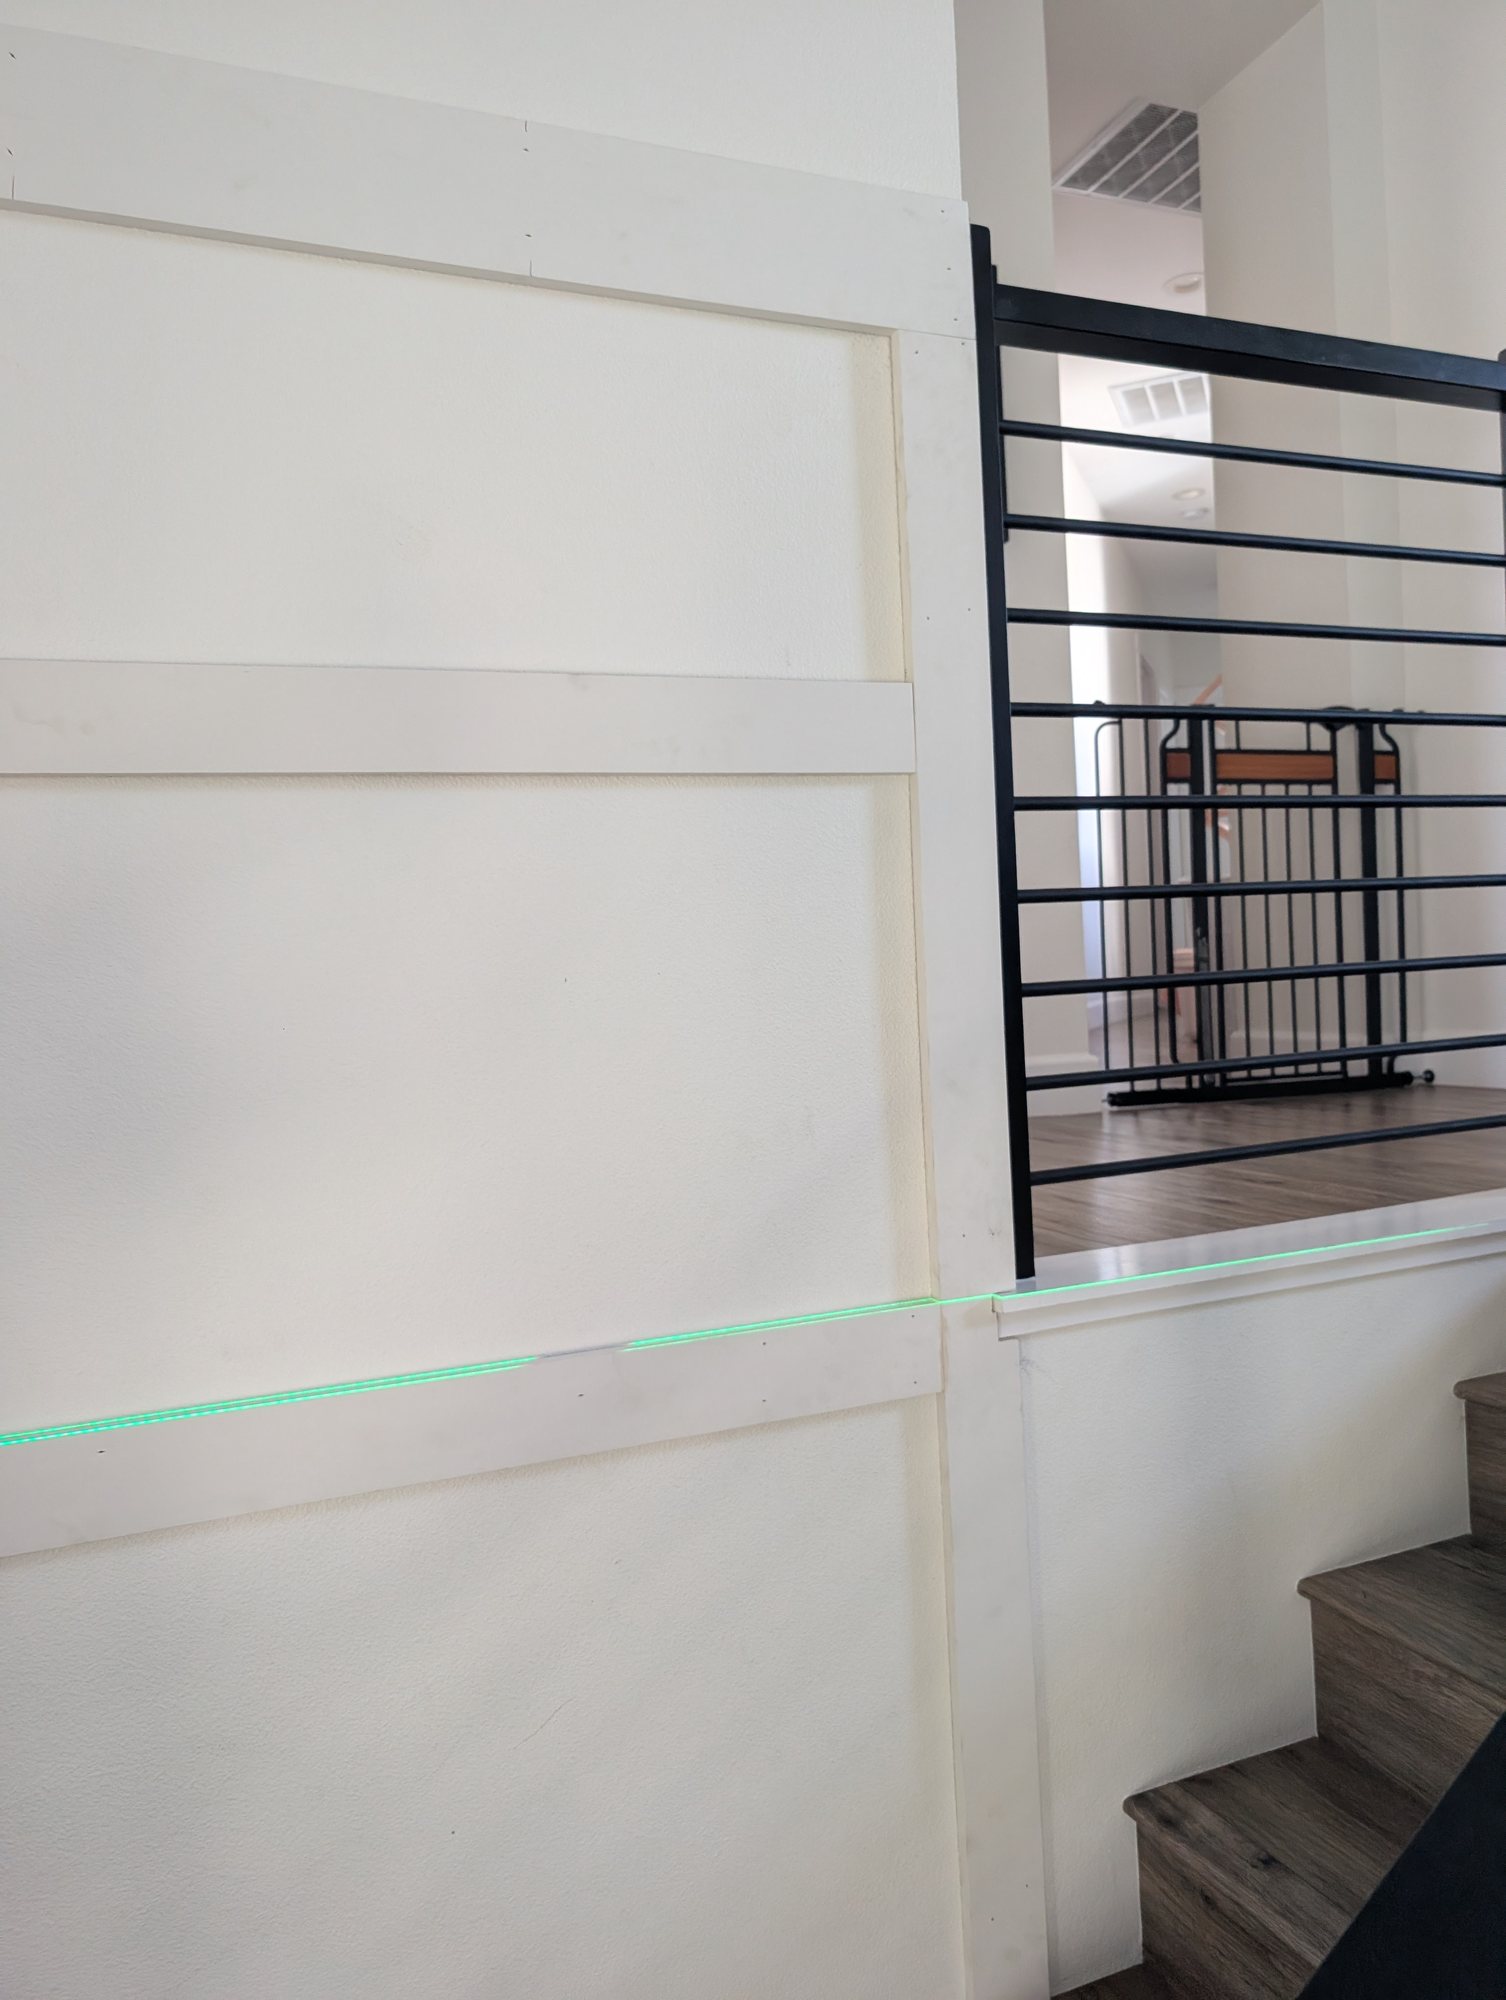
Quick Answer
Holland & Sons Construction sees most staircase wall paneling problems in the Inland Empire start at layout, before a single board is cut. A grid that looks right on paper can land a rail in an awkward spot against a tread or stair cap, so the fix is to choose the one line that has to be right and lay out everything else from it.
Key Takeaways
-
Most stair paneling problems are layout problems, decided before the first cut
-
Wainscot-height paneling follows the stair angle; full-height paneling stays level and plumb
-
Pick one reference line on the staircase and lay out the grid from it
-
Paneling behind a wall-mounted handrail means resetting the rail with proper clearance
-
Brian Holland has been a carpenter since 1991; every job carries a written workmanship warranty
-
See this in action: the Live Oak Project in Jurupa Valley, hsconstruct.com/blog/live-oak-stairwell-paneling-jurupa-valley
The most common problem with staircase wall paneling is a layout that fights the stairs. A rail lands half an inch off a stair cap. A panel gets sliced into a sliver at the landing. The top line drifts away from the handrail as it climbs.
None of that is a cutting mistake. It is a planning mistake, and it is locked in before the first board goes on the wall.
The good news is that stair paneling problems are predictable. There are only a handful of them, and each one has a decision that prevents it. This post goes through those decisions in the order they need to be made.
What Is the Most Common Problem With Staircase Wall Paneling?
The most common problem is a grid that was designed for a flat wall and then installed on a wall with stairs running through it. On a flat wall, you can center a pattern and be done. On a stair wall, the pattern has to agree with treads, a skirt board (the trim board along the wall beside the treads), a stair cap (the trim that finishes the top of a stair wall), a landing, and sometimes a handrail.
When the pattern ignores those, your eye goes straight to the spot where they collide. When it respects them, the stairs and the wall look like they were built together.
Is Stair Wall Paneling Risky? The Usual Worries, Answered
-
Permits. Cosmetic paneling typically does not need a building permit. Rules vary by city and scope, so check with your building department, especially if electrical or framing is involved.
-
Structure. Paneling like this is glued and nailed to the face of the wall. It does not change framing or carry load.
-
Handrails. This is the one to take seriously. A wall-mounted handrail has to stay solid and keep its clearance after paneling goes behind it. Its brackets have to fasten into framing or solid blocking, not just into the paneling. As general guidance, a Permit Sonoma handout based on the California Residential Code lists 34 to 38 inches of height above the tread nosings (the front edges of the treads) and at least 1 1/2 inches between rail and wall. Confirm the numbers with your own city.
-
Electrical. Switches and outlets on a stair wall need to land inside a panel or cleanly on a rail, not half and half. That is a layout fix, not an electrical one, as long as nothing moves.
-
Overruns. Changes after boards are up are what add to a job. Settle the decisions in the table below first. For what the wall itself runs, see what a stairwell paneling project runs in Jurupa Valley.
-
Damage. Treads, railings, and floors get covered before work starts. Ask how.
Which Decisions Have to Be Made Before Anything Is Cut?
| Decision | Must Be Locked In Before Cutting? |
|---|---|
| Follow the stair angle or stay level | Yes: it sets every joint on the wall |
| The reference line the layout starts from | Yes: every other measurement comes off it |
| Top height, and where the paneling stops | Yes: it sets panel proportions and material quantity |
| How each edge ends (corner, ceiling, open end) | Yes: borders and end trim go on before or with the field |
| Existing wall or smooth backing inside the panels | Yes: backing goes on first and changes the material order |
| What happens to the handrail, switches, and outlets | Yes: the grid is spaced around them |
| Second treatment above the paneling | Yes: the line where the two meet has to be set once |
| Paint color | No: it needs to be final before the painter orders, not before carpentry |
Should Paneling Follow the Stairs or Stay Level?
It depends on how tall the paneling is.
Wainscot-height paneling follows the stairs. When paneling runs low beside a flight, its top line should be parallel to the stair pitch, the same way a handrail is. The stiles (vertical boards) stay plumb, which means straight up and down, and the rails (horizontal boards) slope with the stairs.
Full-height paneling stays level. When a grid covers a tall wall, it belongs to the room more than to the staircase. Rails stay level, stiles stay plumb, and the stairs cut across the bottom of the pattern.
The level approach is where the next decision matters most. Because the stairs slice through a level grid, some rail is going to meet some part of the staircase. You get to choose which one.
Where Should the Layout Start?
Not from the floor, and not from the ceiling. On a stair wall, the layout starts from the one line your eye will check.
Usually that is a hard horizontal that already exists: the top of a stair cap, a landing, a window sill, or the second-floor line. Set a laser on it. Put a rail there. Then lay out the rest of the grid up and down from that rail and see where everything else falls.
If the rest lands badly, adjust the spacing, not the reference line. A grid with slightly taller panels looks planned. A rail that misses the stair cap by a finger width looks like a mistake forever.
How High Should It Go, and Where Should It Stop?
For low paneling beside a flight, near handrail height is the usual answer, held the same the whole way up.
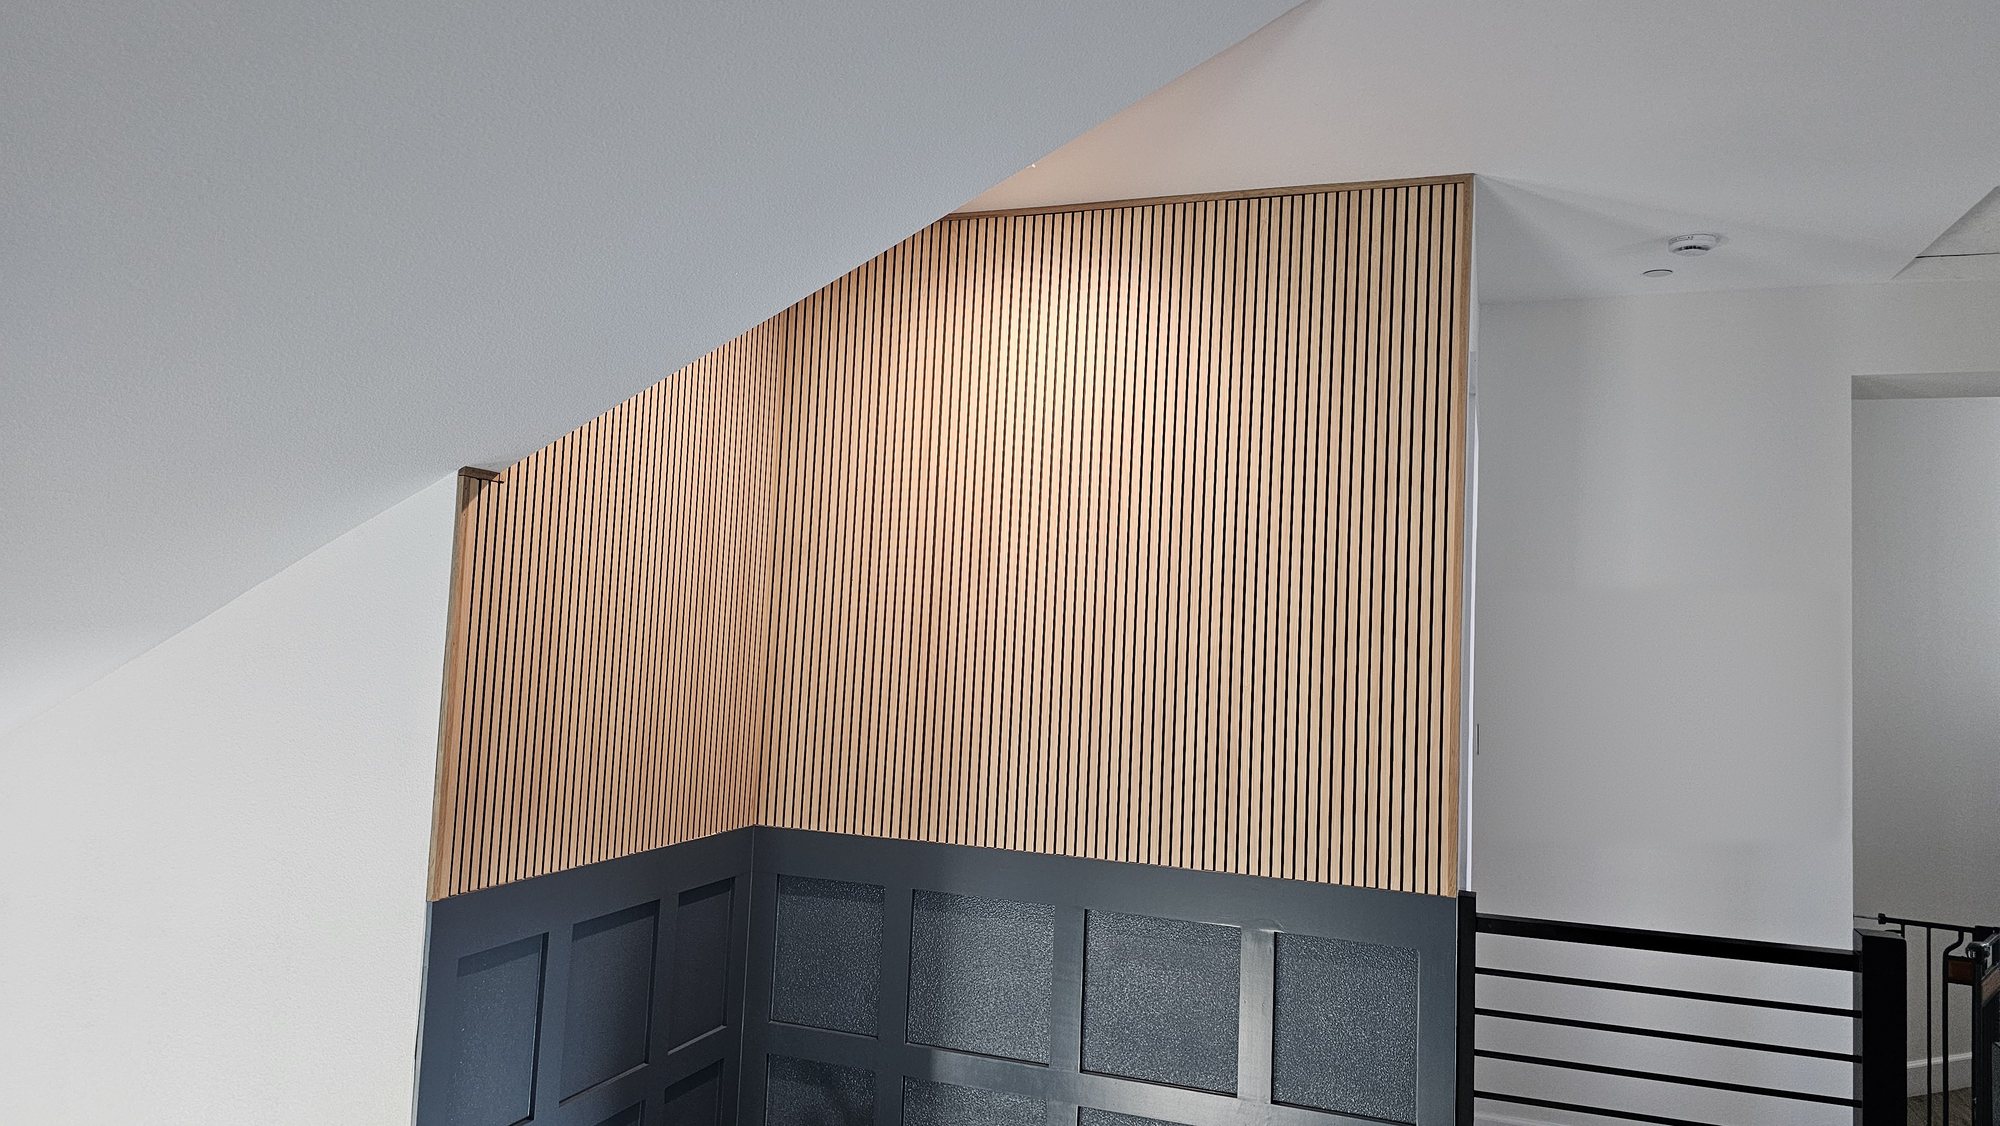
For a two-story wall, there are three honest stopping points: a line that already exists in the house (like the second-floor level), the ceiling, or a planned change to a second material. Stopping at a random height in the middle of a tall wall is the one that tends to look unfinished. We go deeper on proportion for tall walls in wainscoting for two-story rooms.
When two treatments share one wall, give them one clean meeting line and carry it across every wall they touch. In classical design this is called a datum, which in plain terms means one level line that everything agrees on. Two textures can sit on the same wall without looking busy as long as they share that line and their vertical lines do not fight.
Five Common Stair Paneling Mistakes
-
Trusting the drawing over the stairs. A plan is drawn from measurements, and stairs are rarely as square as the measurements say. Before cutting, the layout gets marked on the real wall and checked against the real treads. When something has to move, it moves on the wall first. The hub post shows one of these calls on a designer-drawn job.
-
Measuring from the floor. In a stairwell there is no single floor. Measure every vertical from a level reference line, or the grid will slowly walk out of level as it climbs.
-
Leaving nowhere for the paneling to end. Every treatment needs a place to stop: an inside corner, a border, a piece of end trim. Deciding that at the end leaves raw edges. We cover what a finished edge looks like in how to evaluate a slat wall installation.
-
Forgetting what is already on the wall. Switches, outlets, vents, thermostat wires, and handrail brackets do not move on their own. Mark them on the wall before the grid is spaced.
-
Skipping the texture decision. Paneling over a textured wall and paneling over smooth backing are two different looks. Choose on purpose. The comparison is in board and batten over textured walls vs. smooth backing.
A Simple Way to Check a Stair Paneling Plan
Before anyone cuts, ask for the layout on the wall, in tape or pencil, and walk it.
-
Stand at the front door. Is the first thing you see a full panel or a sliver?
-
Find the reference line. Does a rail sit exactly on it?
-
Follow the stairs up. Does any rail land close to, but not on, a tread, cap, or landing?
-
Look at every edge. Is there a named piece of trim where each treatment ends?
-
Find every switch, outlet, and bracket. Is each one fully inside a panel or fully on a board?
If all five pass, the hard part of the job is done. If a designer drew the plan, bring the carpenter and the designer together for this walk. We wrote about who does what on a designer job if you want to know how that usually goes.
See This In Action: The Live Oak Project
One rail, moved a touch, changed how a whole stairwell reads. On the Live Oak Project in Jurupa Valley, the designer's drawing put a horizontal rail at an awkward spot against a stair tread. We asked to shift the layout so that rail sits flush with the top of the stair cap, and the designer said yes.
What we used on this project:
-
A laser set on the top of the stair cap as the single reference line
-
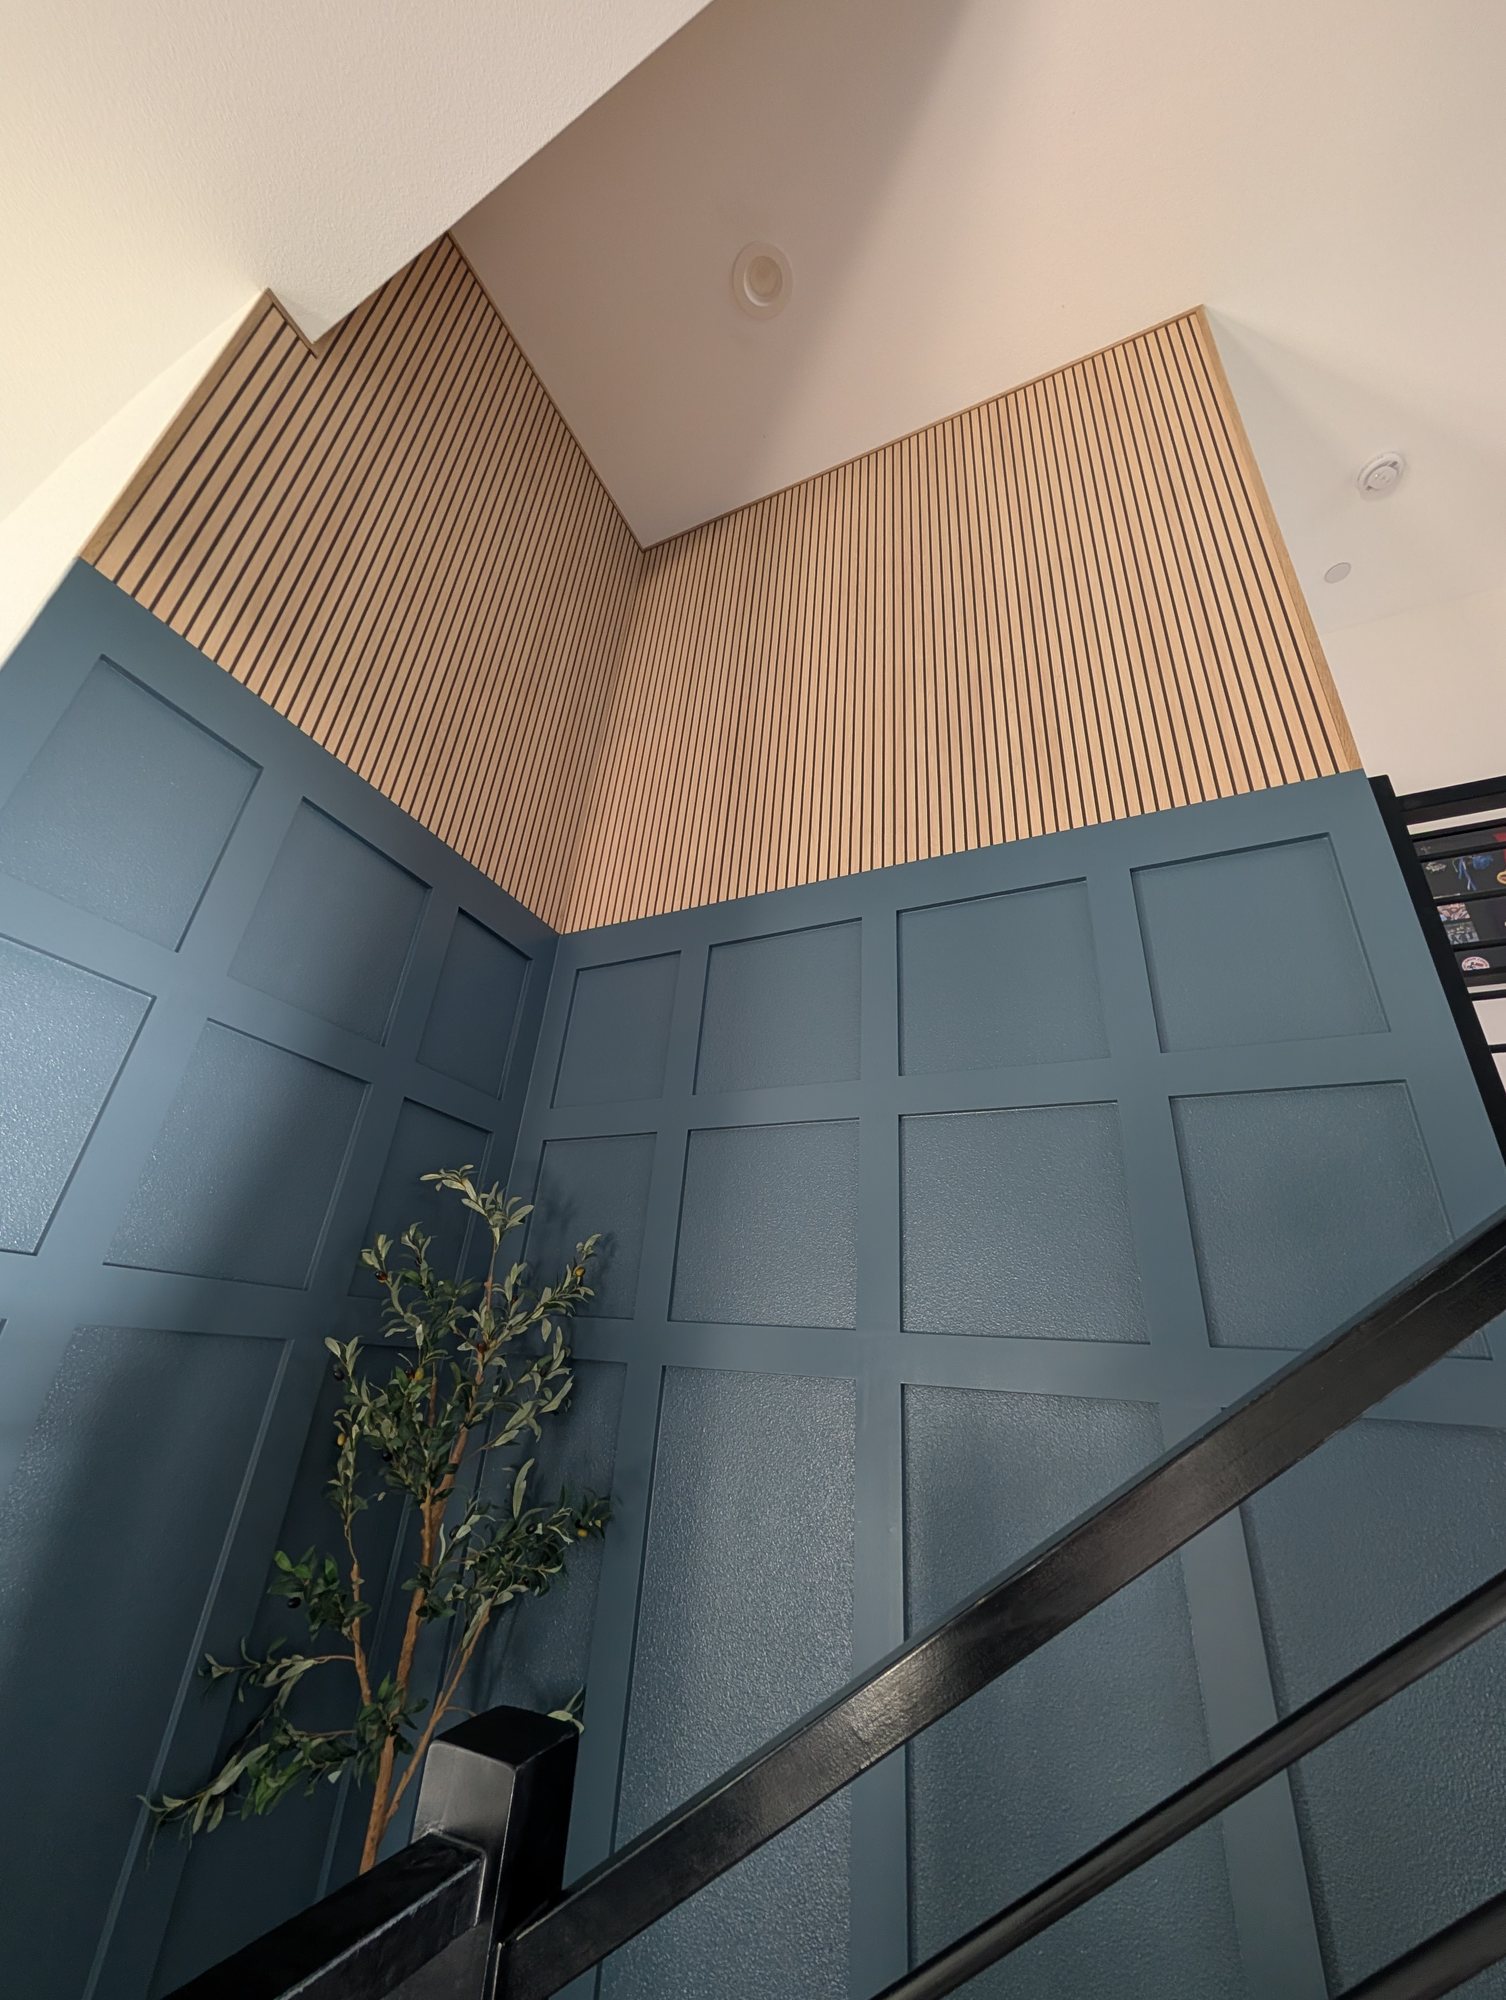
A level shaker-style grid in primed pine, laid out up and down from that line
-
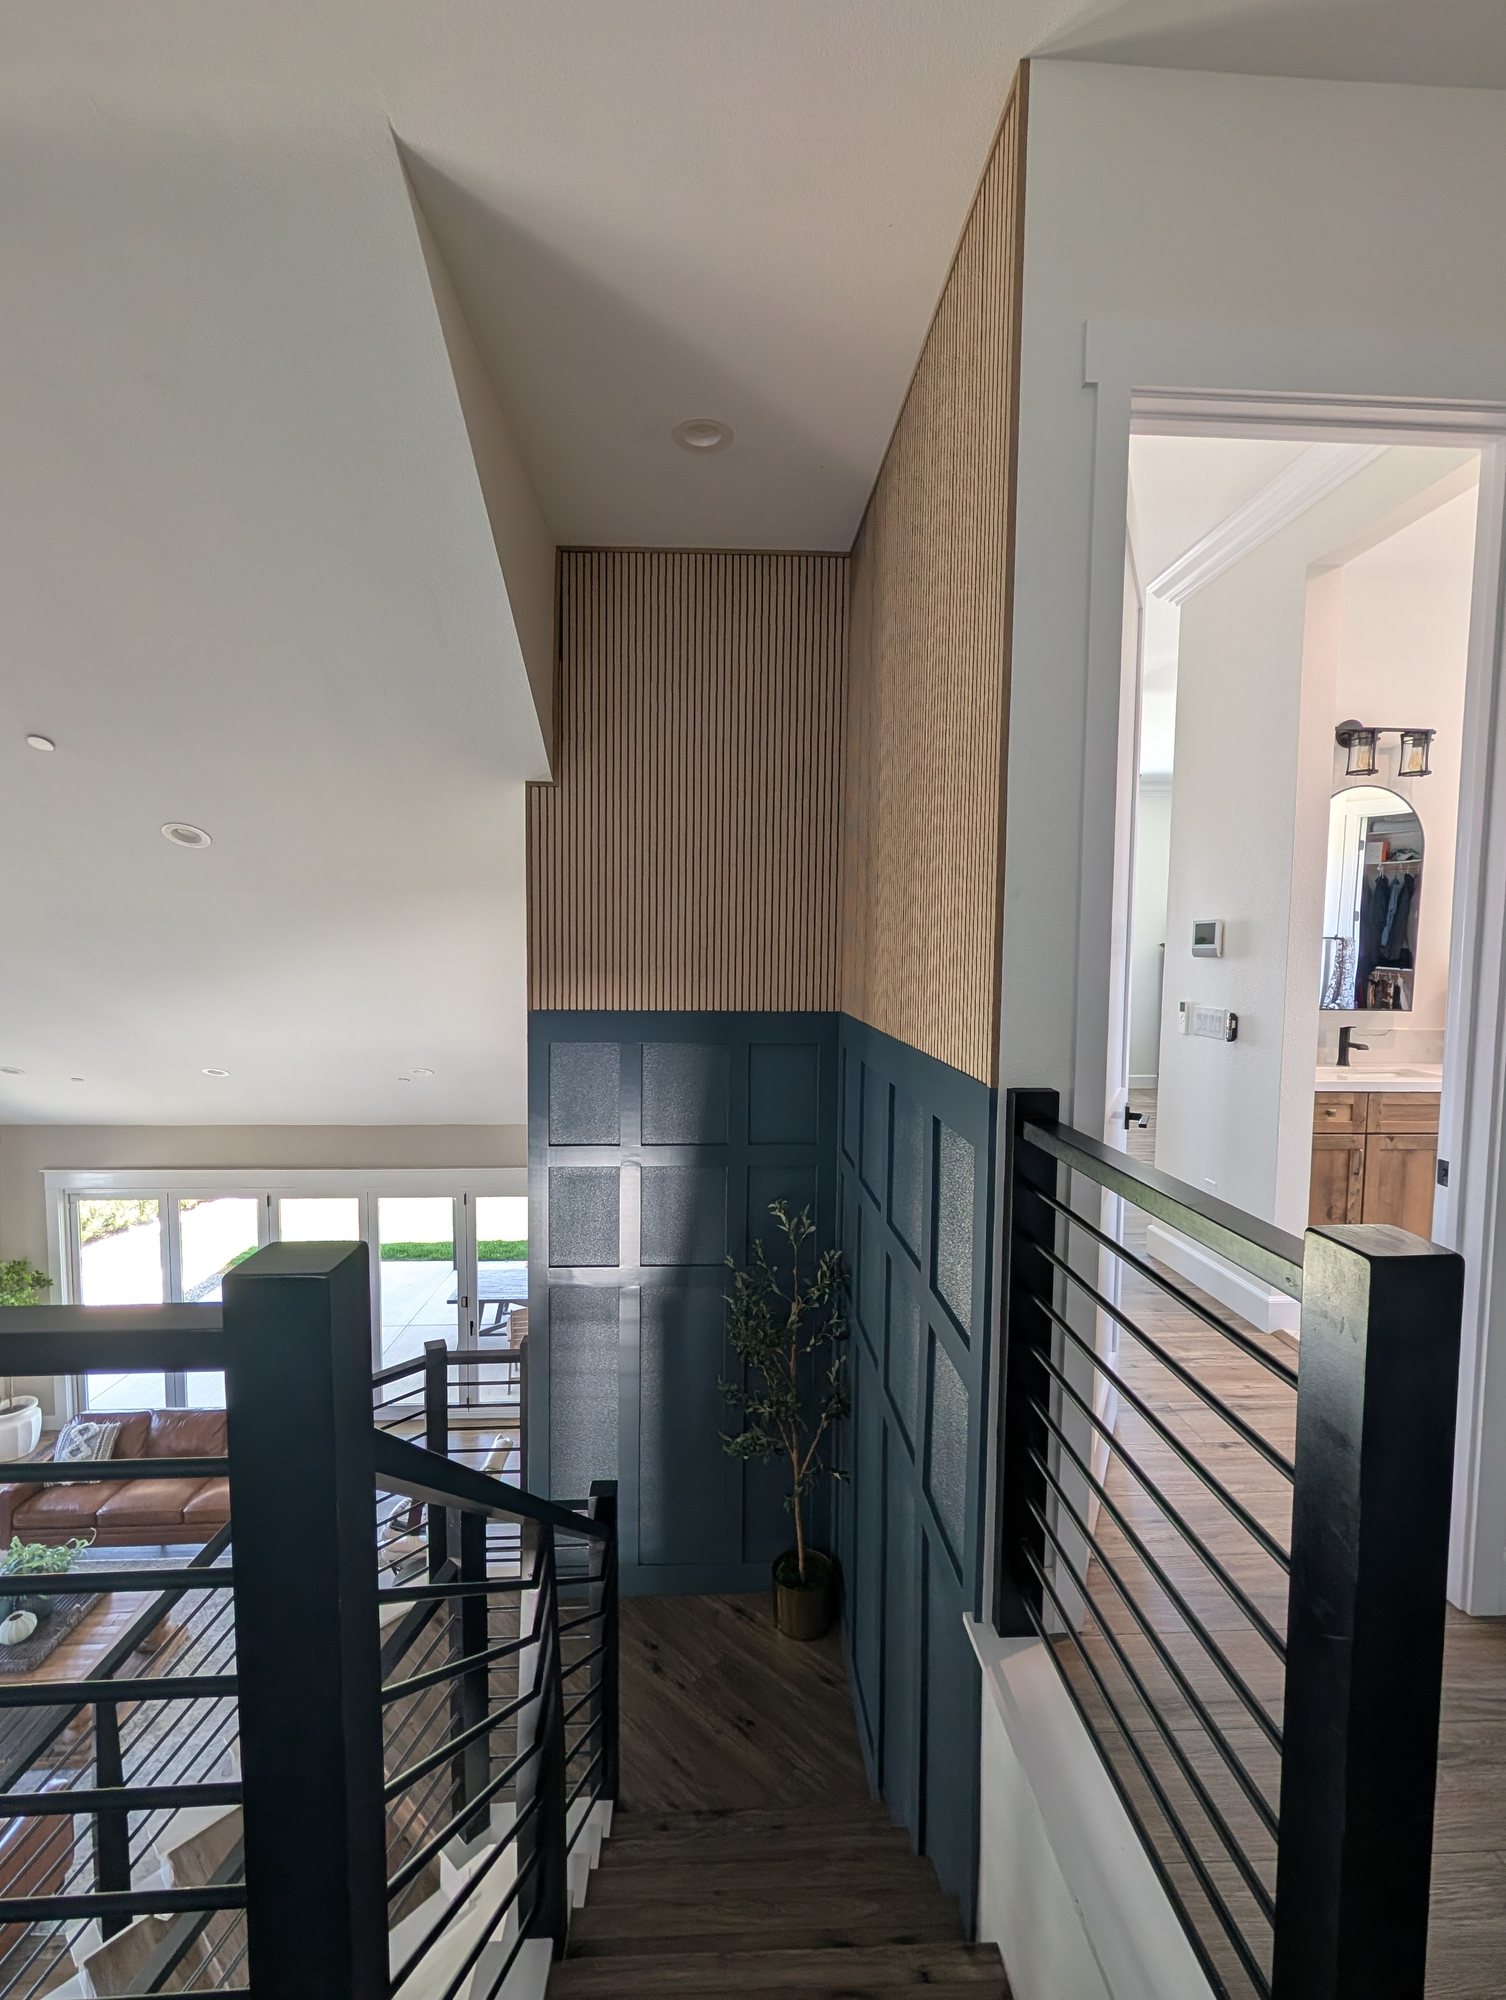
Plumb stiles and level rails across two walls that meet in a corner
-
One clean line where the painted grid ends and the white oak slats begin
The hub post has the photos of that laser line, the full investment breakdown, the timeline, and the construction details: hsconstruct.com/blog/live-oak-stairwell-paneling-jurupa-valley
Can You Panel a Stair Wall Yourself?
Parts of it, yes. Low paneling beside a single straight flight is a fair weekend project for someone comfortable with a miter saw. The skills are measuring the stair angle, cutting matching miters, and keeping the stiles plumb.
Where it goes wrong is height. The upper wall of a stairwell sits over an uneven surface, and that is not a place to improvise. Stacking a ladder on a tread, or laying a board across the stairs to stand on, is how people fall. If the wall cannot be reached with equipment made for stairs and set up the way its maker intends, that portion is the point where most homeowners hand it off.
A common split works well: the homeowner settles the design and the height, and a crew builds and paints everything above arm's reach. If you are thinking about adding slats up high, read what acoustic slat panels do and do not do before you order anything.
The Holland & Sons Angle
On Live Oak, the drawing and the stairs disagreed by a small amount in one spot. I could have built it as drawn. Nobody would have called it wrong. But I knew that rail would sit just off the stair cap, and I knew I would see it every time I looked at a photo of that job.
So I asked. It was the designer's plan, not mine, and the right move was to show her the problem on the wall and get her yes before changing anything. Then the laser went on the stair cap and everything else came off that line. It is the same thinking we bring to every one of our accent walls.
That habit is what I most want my sons to carry forward. Find the line that has to be right before you pick up the saw. The cutting is the easy part to teach.
Related Resources: Stairwell Wall Paneling Guide
This post is one part of a set built around one real stairwell in Jurupa Valley. Here is the rest of it.
-
Stairwell Wall Paneling in Jurupa Valley, CA: Shaker Grid Below, White Oak Slats Above (Live Oak Project), hsconstruct.com/blog/live-oak-stairwell-paneling-jurupa-valley: the full project, with photos, materials, timeline, and the complete investment breakdown
-
How Much Does It Cost to Panel a Staircase Wall in Jurupa Valley in 2026?: real ranges and what height and access do to them
-
Board and Batten Over Textured Walls vs. Smooth Backing: what each option looks like and when smooth backing is worth adding
-
Do Acoustic Slat Wall Panels Really Reduce Echo?: what these panels do for sound and what they do not
-
How to Evaluate a Slat Wall Installation: a checklist for edges, seams, corners, and finish
Frequently Asked Questions
Should stair wall paneling follow the angle of the stairs or stay level?
Stair wall paneling should follow the angle of the stairs when it is wainscot height, and stay level and plumb when it runs the full height of the wall. Low paneling beside a flight of stairs reads as part of the staircase, so its top line runs parallel to the stairs. A tall grid that covers a two-story wall reads as part of the room, so its rails stay level and its stiles stay plumb. On the Live Oak Project in Jurupa Valley, the grid is level, with one rail set flush with the top of the stair cap.
What height should paneling be going up the stairs?
Wainscot-height paneling going up stairs usually lands near handrail height, measured straight up from the front edge of the treads and held the same the whole way. That keeps the top line parallel to the stairs. For a two-story wall, height is a proportion question more than a number, and the paneling often runs well past the second floor line. The one rule that holds everywhere: pick the height on the wall with tape or a laser before anything is cut.
Do you panel both sides of a staircase?
You panel both sides of a staircase only when both sides are walls. Many Inland Empire stairwells have a wall on one side and an open railing on the other, so the paneling goes on the wall side and wraps the corner at the landing. When a staircase runs between two walls, paneling both keeps it from looking half done, but it also narrows the stairway slightly, so check handrail clearance first.
How do you work out the angles for stair paneling?
You work out stair paneling angles by measuring the actual staircase with an angle finder, never by assuming a standard pitch. Set the tool on the skirt board (the trim board that runs along the wall beside the treads) or across the front edges of the treads and read the angle. Every miter where a sloped piece meets a level or plumb piece comes from that reading. Check it at the top and the bottom of the flight, because the two do not always match.
Does the handrail go over the paneling, or does the paneling stop under it?
A wall-mounted handrail goes over the paneling, with its brackets fastened through the paneling into solid framing. Paneling adds thickness to the wall, so the rail has to be reset to keep its clearance. A Permit Sonoma handout based on the California Residential Code calls for handrails 34 to 38 inches above the tread nosings with at least 1 1/2 inches of clear space between the rail and the wall. Check your own city's requirements before the rail goes back up.
Can I panel a two-story stair wall myself?
A handy homeowner can panel the lower stair walls, but the two-story portion is where most people hand the job off. Wainscot-height paneling beside a single flight takes a miter saw, an angle finder, and patience. The upper wall is different. It has to be reached over an uneven surface, and a ladder or plank set up wrong over stairs is how people get hurt. If you cannot reach it with equipment made for stairs, that part belongs to a crew that does it regularly.
Does wall paneling make a stairway narrower?
Wall paneling makes a stairway slightly narrower, usually by the thickness of the boards, which is about three quarters of an inch per paneled wall. On most stairs that is not noticeable. It matters at the handrail, because the rail moves out with the wall surface. Any time paneling goes behind a wall-mounted rail, the rail gets taken off, the paneling goes on, and the rail is reset with proper clearance and solid fastening.
What needs to be decided before stair wall paneling starts?
Five things need to be decided before stair wall paneling starts: whether the paneling follows the stairs or stays level, which line on the staircase the layout starts from, how high the paneling goes, how each edge ends, and what happens to anything already on the wall. Paint color can wait a little. Those five cannot, because each one changes where boards land.
Want a Second Set of Eyes on Your Stair Wall?
If you are planning paneling for a staircase and want the layout right before anything is cut, tell us about it at hsconstruct.com/contact. Fill out the form, describe the stairwell, and upload photos from the bottom and the top, plus any drawings or inspiration photos. We will set a time to see it in person.
Want to see this advice applied to a real project? Here's the full breakdown: hsconstruct.com/blog/live-oak-stairwell-paneling-jurupa-valley
We work in Jurupa Valley, Eastvale, Norco, Corona, Riverside, Chino, Chino Hills, Ontario, Fontana, Rancho Cucamonga, and all across Riverside County, San Bernardino County, and the Inland Empire.
See more of our work on Facebook, Instagram, YouTube, and TikTok.
951-338-8058 | brian@hsconstruct.com | hsconstruct.com | CSLB #1123738
More Than Just Stair Wall Paneling
Getting a grid to agree with a staircase is layout work, and layout is most of finish carpentry. Stair Wall Paneling is one piece of what we do at Holland & Sons, and it's one chapter in a much longer story. Brian has been a finish carpenter since 1991, and his sons now build alongside him, which means every room in your home is fair game. If your space needs more than a paneled stair wall, here's what else we build:
-
Kitchen and bathroom remodels: full custom cabinetry, tile work, and finish carpentry from demo to done
-
Custom and built-in cabinetry: designed for the room, built in the shop, installed to last
-
Media walls and entertainment walls: built-in TV walls with storage, lighting, and clean cable management
-
Fireplace walls: mantels, surrounds, and full-height paneling that make the fireplace the center of the room
-
Accent walls: paneling, slat walls, and feature walls that give one wall a job to do
-
Mudrooms: lockers, bench seating, cubbies, and hooks, built for the way your family comes through the door
-
Coffered ceilings: grid beam systems that add architectural depth to any room, sized and proportioned to the space
-
Wainscoting and wall paneling: classic raised panel, flat panel, board-and-batten, and shiplap applications
-
Reclaimed wood accents: feature walls, fireplace surrounds, and detail work using salvaged material with real character
-
Beam wraps: hollow wood wraps that give exposed beams the look of solid timber without the structural engineering
-
Crown molding, baseboards, and trim carpentry: the details that make a house feel finished, from a single room to a whole home
-
Cased openings and interior door replacements: clean transitions between spaces that most contractors overlook
Wood, proportion, and rooms that feel right. That's what we do. hsconstruct.com
This guide is part of our wainscoting & paneling series.
Learn more about Wainscoting & PanelingHave a project in mind? Let's start a conversation.
Tell us what you are thinking about and we will give you a straight answer about scope, timeline, and investment.
Start a Conversation