
Wainscoting in Rancho Cucamonga, CA: How We Grounded a 20-Foot Dining Room — Smokestone Wainscoting
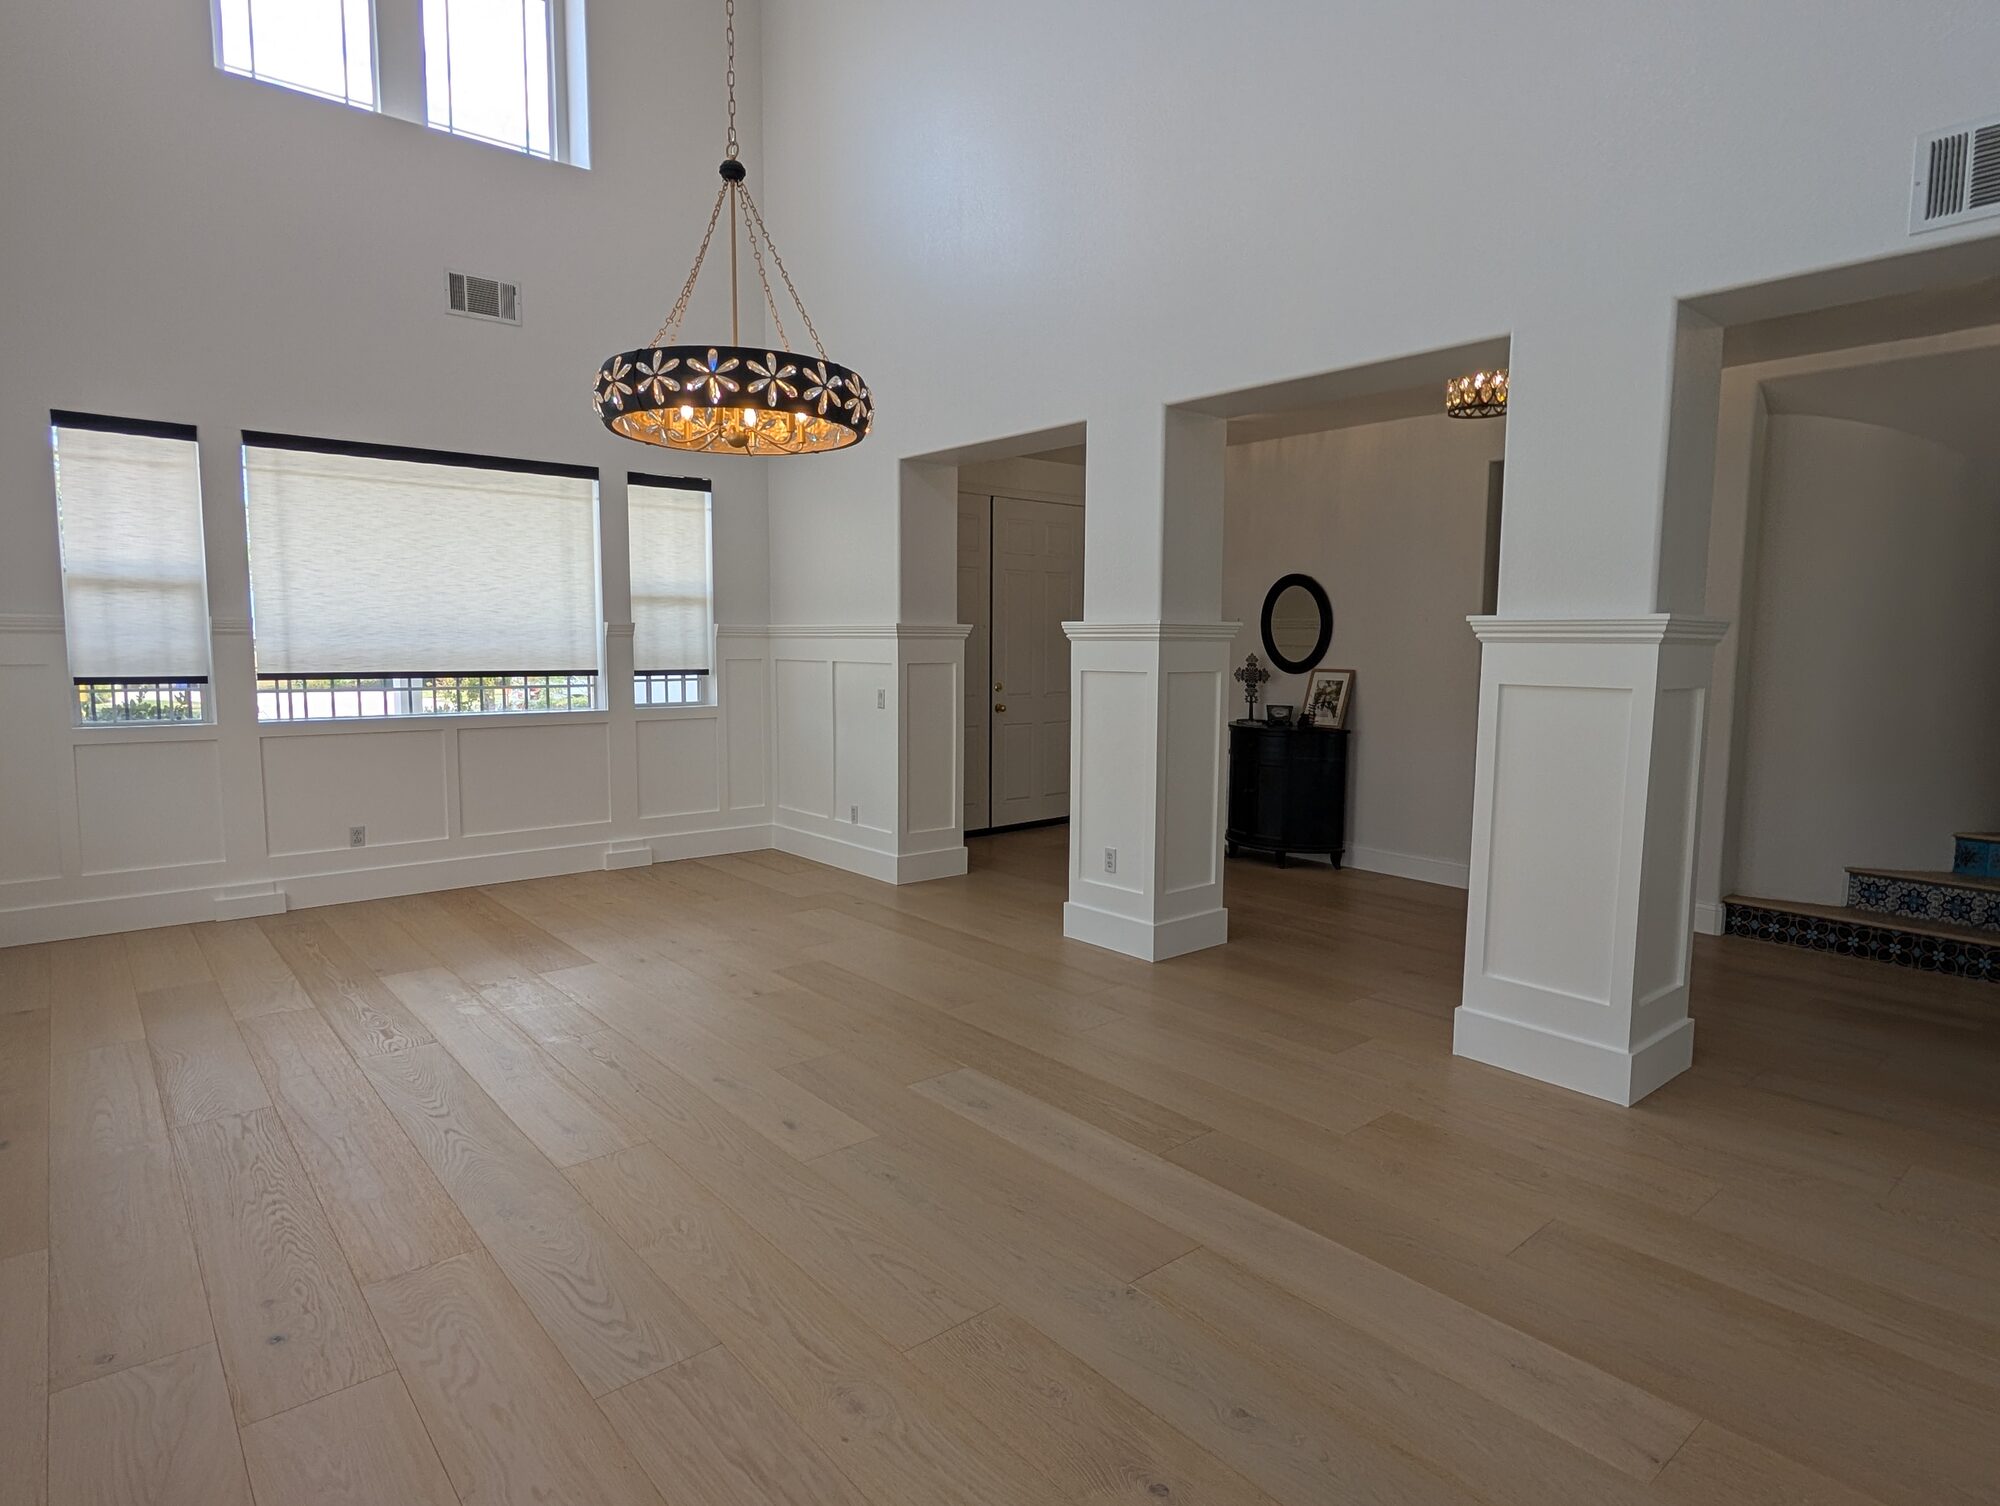
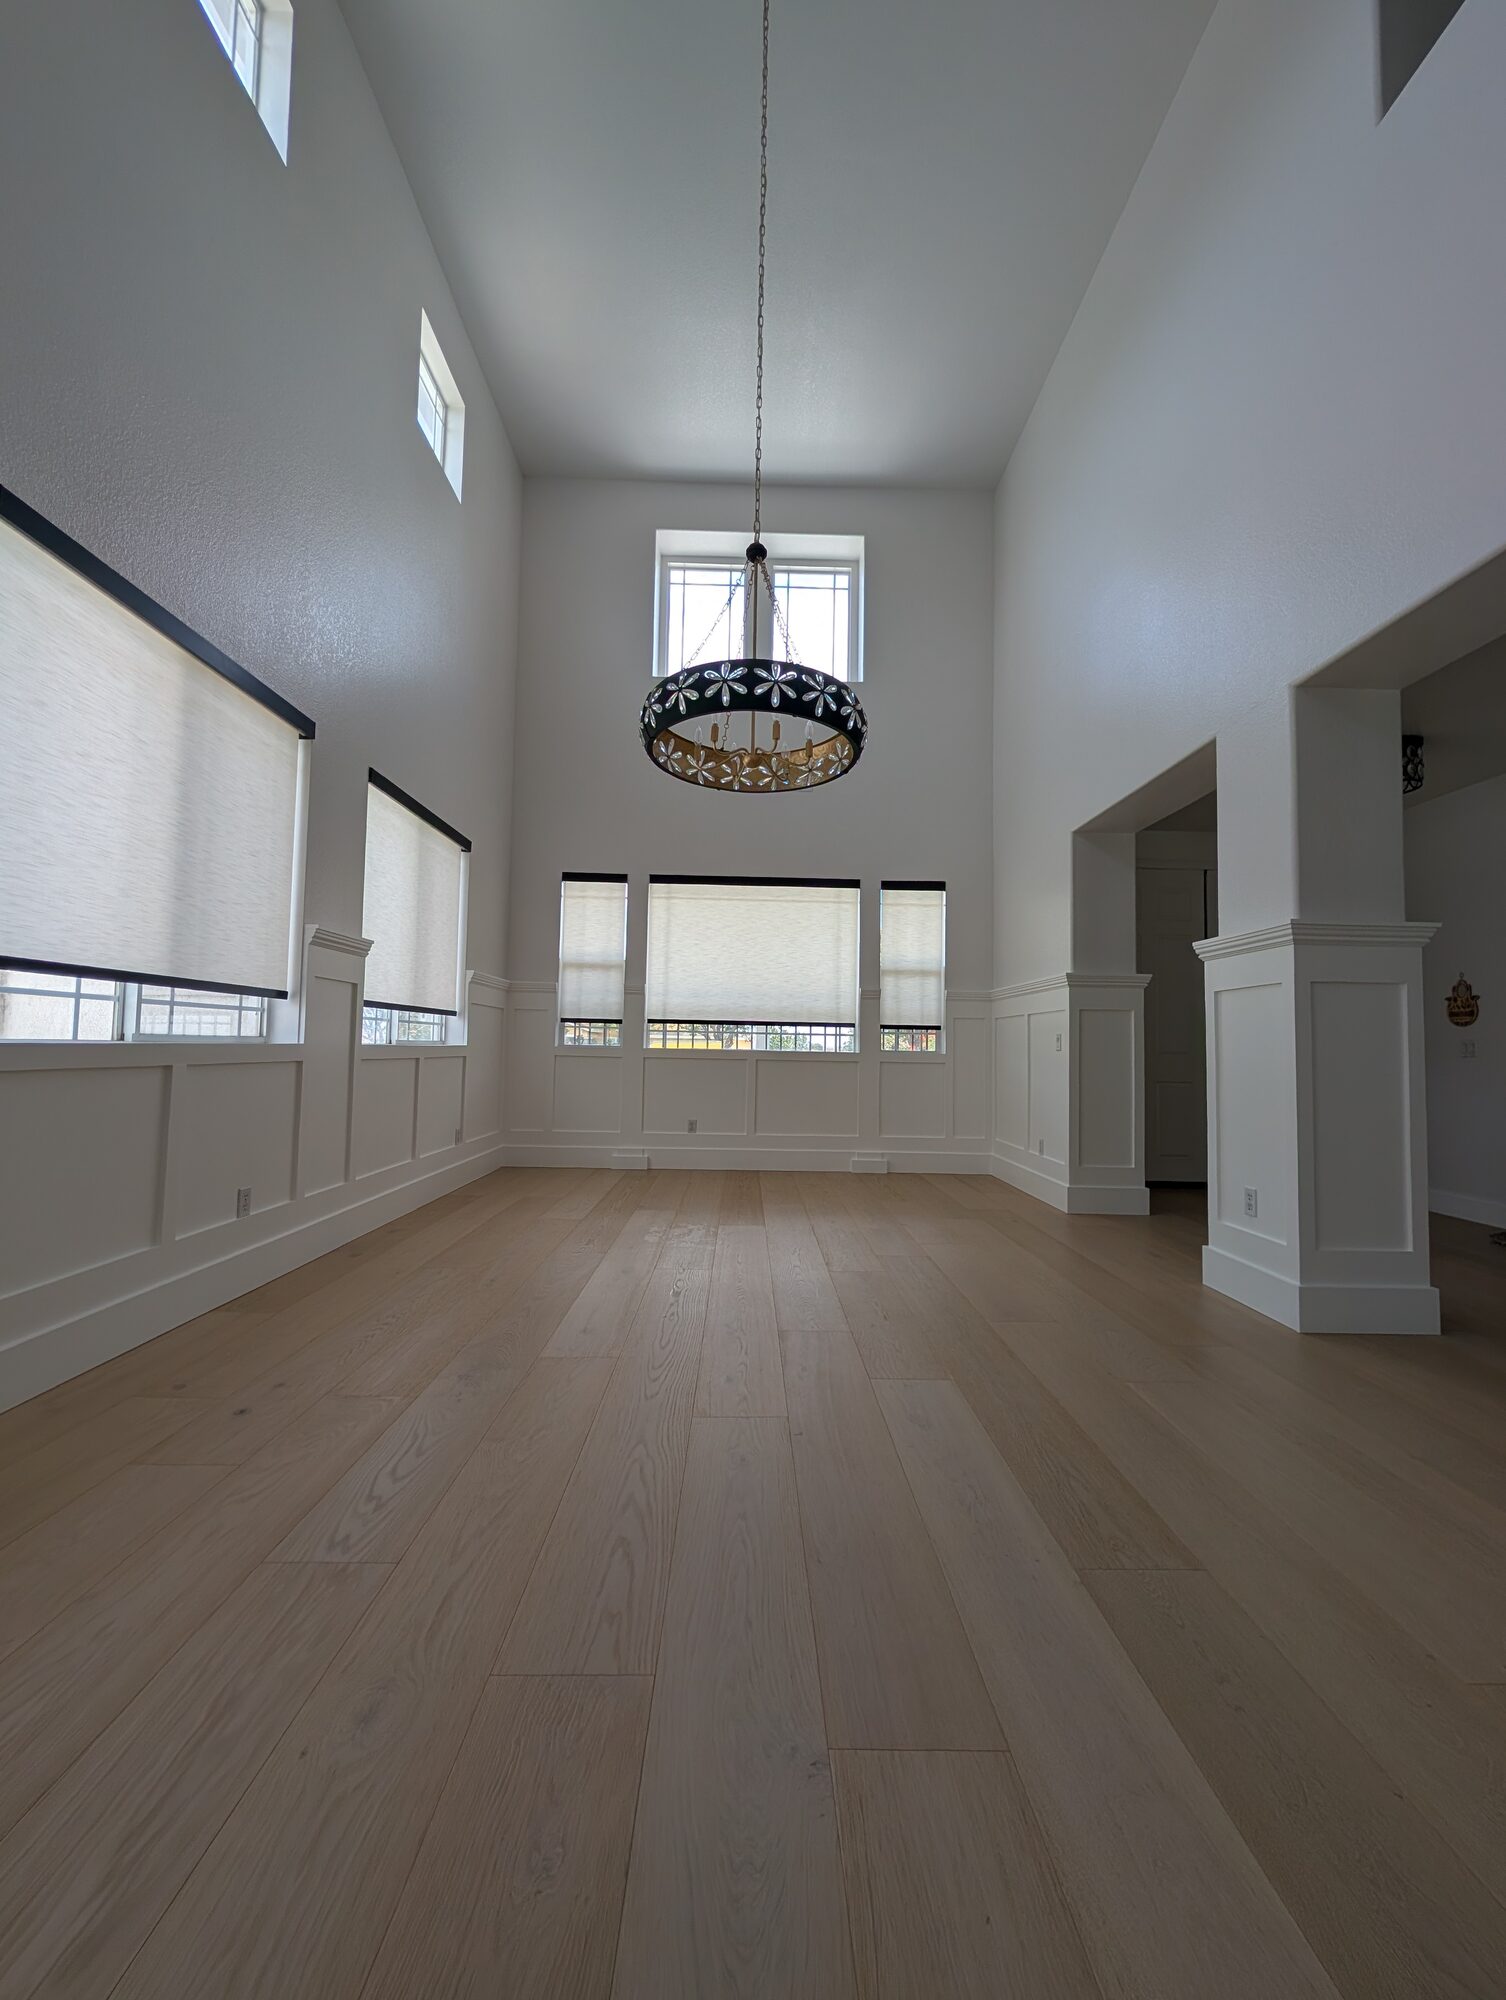
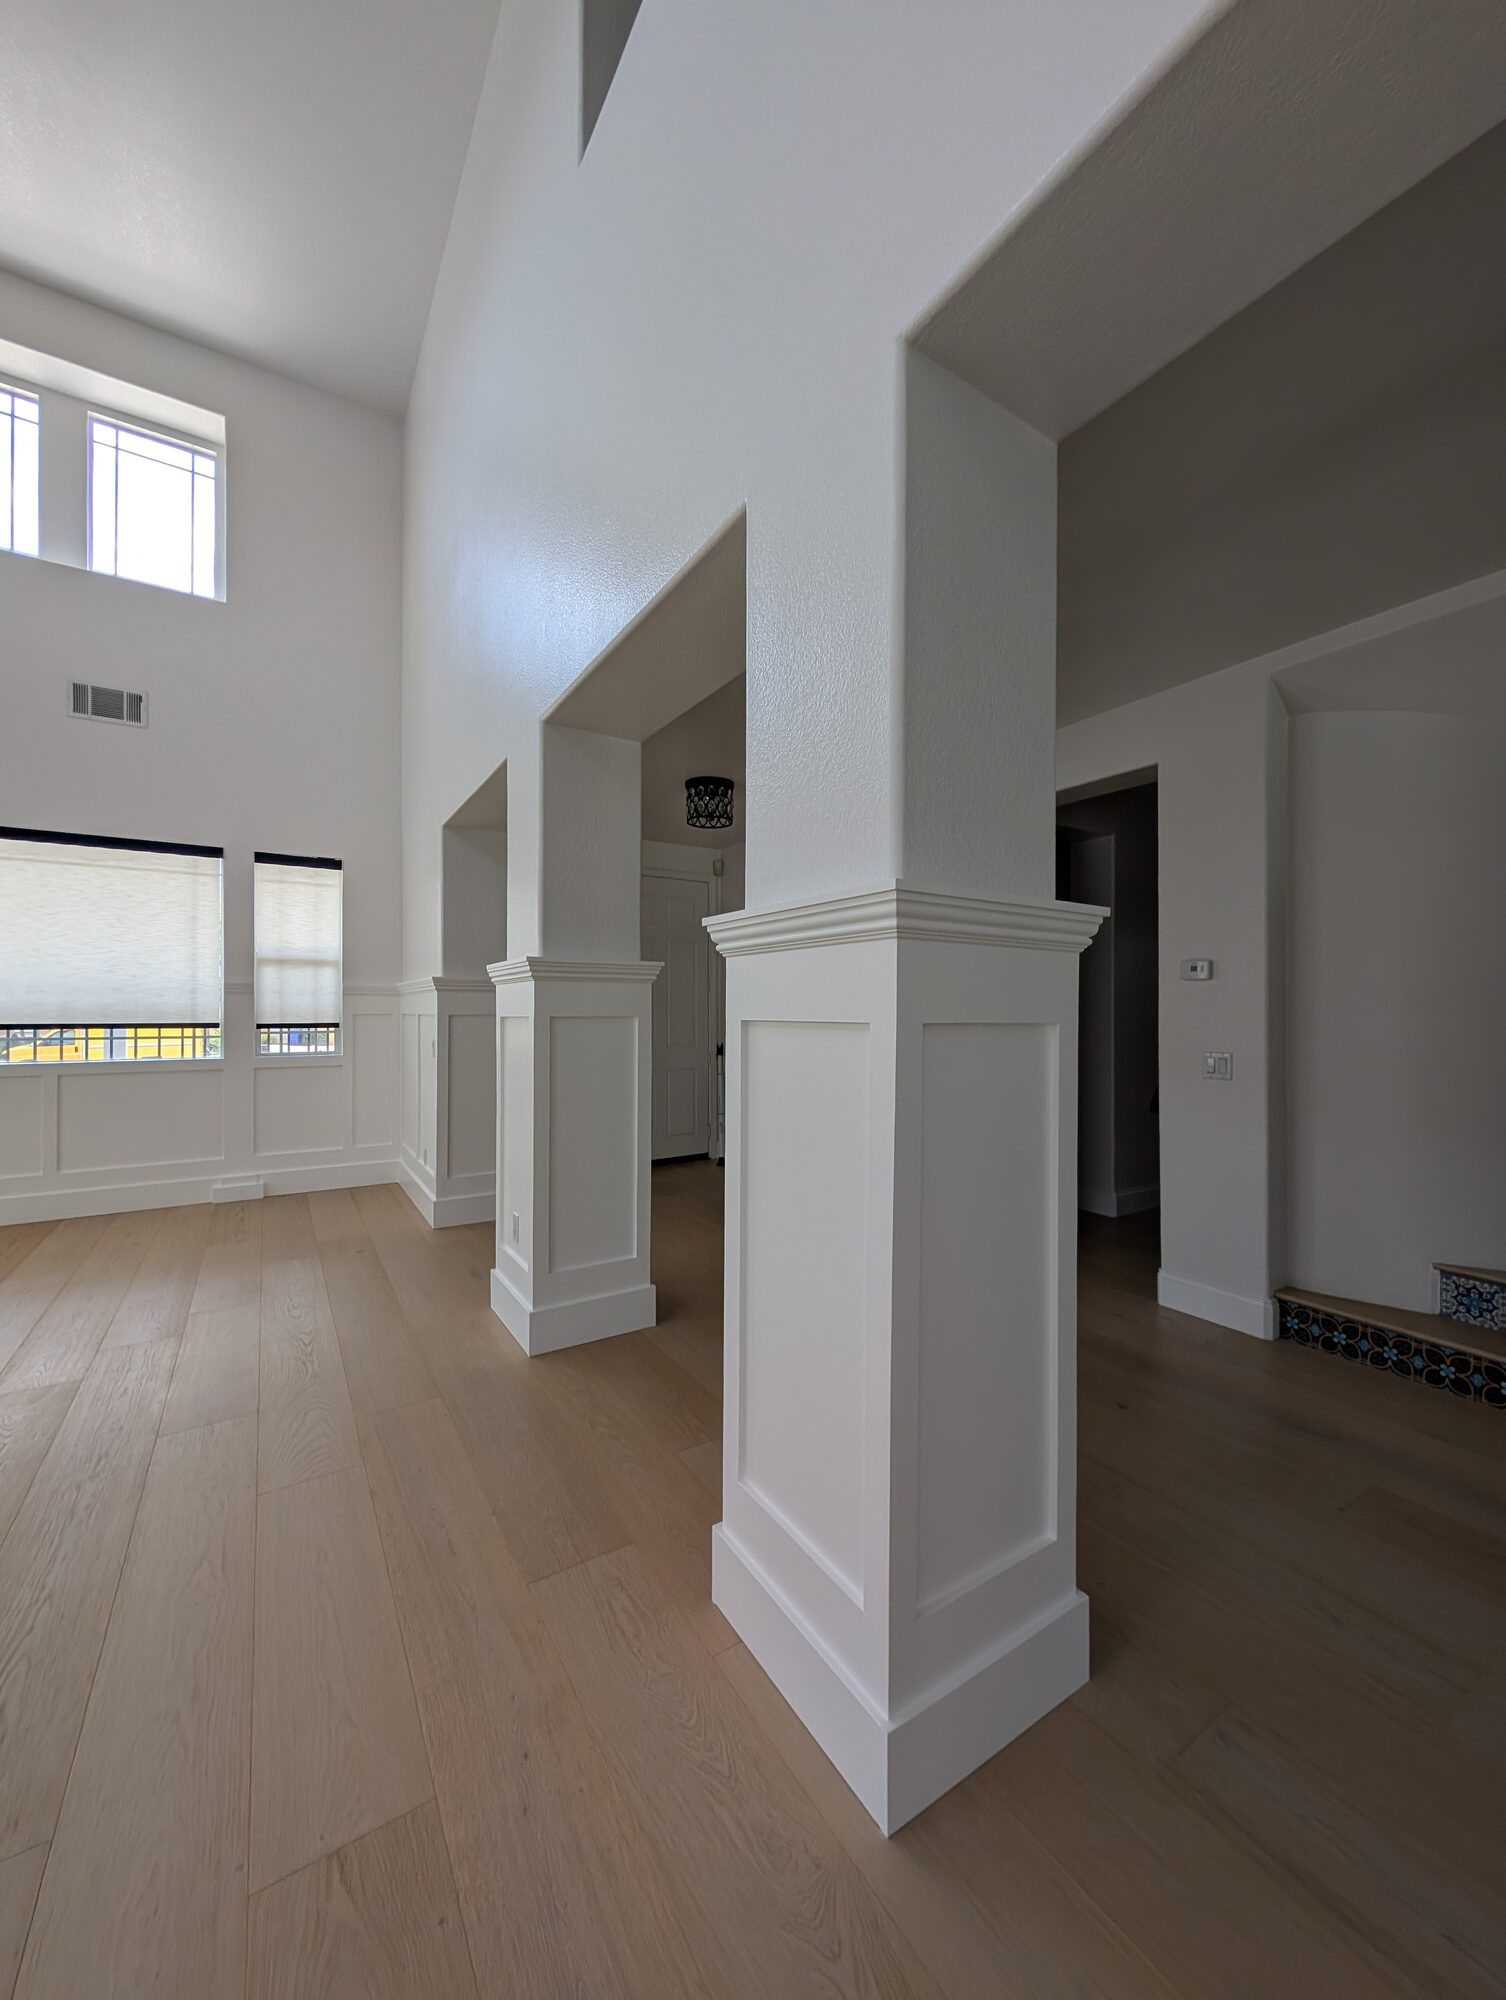
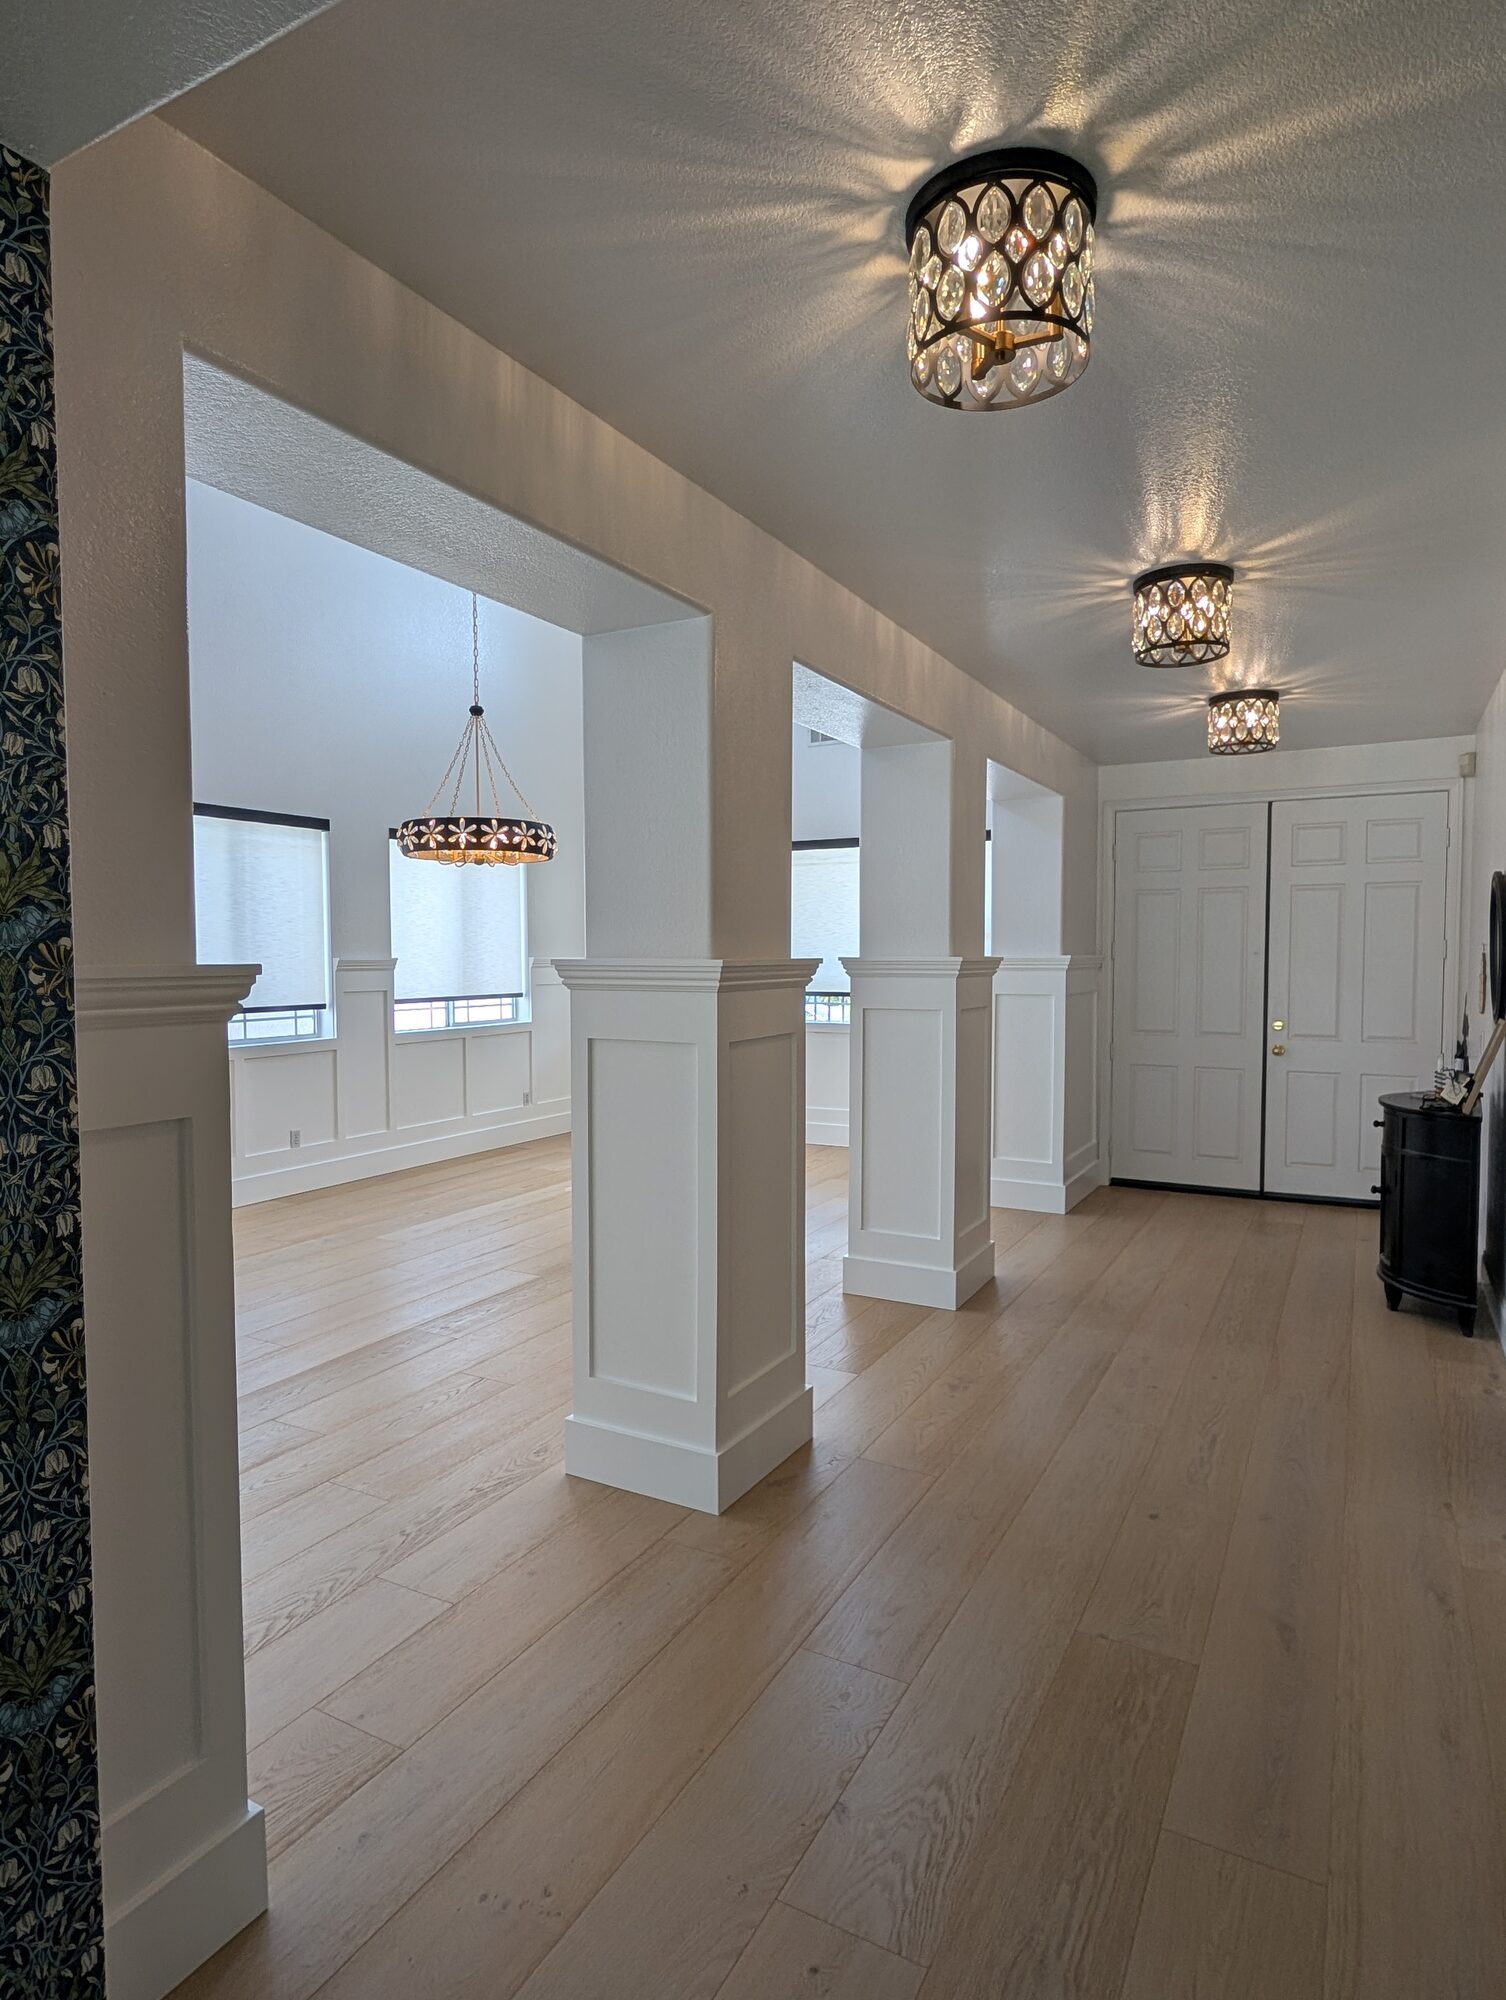
Quick Answer: Holland & Sons Construction built 86 linear feet of paint-grade flat-panel wainscoting with a pediment crown and cap in a 20-foot-ceiling dining room in Rancho Cucamonga, CA, including paneled wraps on three entry columns. The investment was $12,980. The project took 7.5 working days on site, 4.5 days of carpentry plus 3 days of painting, finished in Sherwin-Williams Emerald Urethane Trim Enamel in Pure White.
Fast Facts
-
Project Investment: $12,980
-
Similar Holland & Sons Projects: $8,000 – $25,000+ — scope, materials, and finish level can push this well beyond that
-
Financing: Financing available, on approved credit
-
Ready to talk? hsconstruct.com/contact
Project at a Glance
| Field | Value |
|---|---|
| Location | Rancho Cucamonga, CA |
| Investment | $12,980 |
| Shop Fabrication | None — all fabrication done on site |
| On Site | 7.5 working days (4.5 days carpentry, 3 days painting) |
| Scope | 86 linear feet of flat-panel wainscoting with pediment crown and cap, three paneled column wraps, and faux columns on the front window wall |
| Key Feature | Glued, biscuit-jointed panel sections built to look right in a room that gets sun all day |
| Stiles and Rails | Paint-grade pine |
| Panels and Backing | MDF |
| Paint | Sherwin-Williams Emerald Urethane Trim Enamel, Satin |
| Color | Sherwin-Williams Pure White (SW 7005) |
| Permit | Not required for this project |
| Built By | Holland & Sons Construction |
| Financing | Financing available, on approved credit |
| Service Area | Rancho Cucamonga, Eastvale, Corona, Riverside, Menifee, Murrieta, Temecula, Perris, and the Inland Empire |
| License | CSLB #1123738 |
Ready to move forward? hsconstruct.com/contact
Key Takeaways
-
Holland & Sons wainscoting projects generally run $8,000 – $25,000+, depending on footage, construction details, and finish
-
This project: $12,980 — 7.5 working days on site (4.5 days carpentry, 3 days painting), no shop fabrication days; all fabrication done on site
-
Key Feature: glued, biscuit-jointed panel sections built for a room flooded with light all day
-
Included: 86 linear feet of flat-panel wainscoting, pediment crown and cap, three paneled column wraps, and full painting
-
Permit: not required for this project; check with your city for yours
-
Key materials: paint-grade pine, MDF, Sherwin-Williams Emerald Urethane Trim Enamel in satin, Pure White (SW 7005)
-
Layout refined on site through four to five full-scale mockups with the homeowner
What This Project Solved
This home sits in a tucked-away Rancho Cucamonga neighborhood of large houses on big lots, the kind of established street where every yard is cared for. The homeowner had already remodeled nearly every room. One was left.
The dining room.
It's a huge formal room with 20-foot ceilings, three columns opening to the entry hall, and big windows on two walls. Here's what she was living with:
-
Bare drywall running from a 20-foot ceiling straight down to the floor
-
The last unremodeled room in a house where everything else was finished
-
A room big enough to impress, with nothing on the walls to hold it together
-
No base for what she had planned next: a large chandelier, artwork, and custom window treatments
She wanted this room to be the showstopper. Wainscoting was step one: give the walls a finished base, so everything she adds later has something to stand on.
How We Designed It
Most Holland & Sons projects start at Brian's drafting table. On this one, Brian brought in an outside interior designer to try a 3D workflow in SketchUp, a 3D modeling program, and the homeowner approved the renderings.
Then we laid it out full-scale on the real walls, and it didn't work. Every window in the room is a different size, and the rendered panel spacing left no clean way to end the wainscoting at each sill.
So Brian and the homeowner spent about half a day in the room, working through four or five full-scale mockups to settle:
-
How to end the pediment crown at each window
-
Where her custom window treatments would land, since nothing could be caulked to the windows
-
Whether each stile (the vertical frame piece) sat inboard or outboard of the window edge
-
How to build faux columns on the front window wall so it reads as one design
What this project taught us: Digital renderings can establish the look of a wainscoting design, but they can't replace full-scale layout on the actual walls when windows vary in size and position. On this job, four to five on-site mockups settled the panel spacing, cap terminations, and window-treatment clearances before anything was installed.
What We Built
The final layout came out of the room itself: mocked up full-scale on site with the homeowner, then built to match. Here's what went into it and why.
Why We Chose These Materials
This room was always going to be painted, so every choice was about a smooth, flat, durable painted surface that holds up in heavy sun. Paint-grade pine and MDF were the right call for this job.
| Material | Used For | Why We Chose It | Limitation | Alternative Considered |
|---|---|---|---|---|
| Paint-grade pine | Stiles, rails, caps, and moldings | Mills clean, holds a crisp edge, takes glue and paint well | Solid wood shrinks and swells with moisture (USDA Wood Handbook), so joints have to be tight and glued | Stain-grade hardwood: adds investment for grain that gets painted over |
| MDF | Panel fields and backing | Flat and smooth, with no grain to show through paint | Swelling from moisture isn't fully reversible (Composite Panel Association); best in dry interior rooms like this one | Solid wood panels: less flat under paint |
| Sherwin-Williams Emerald Urethane Trim Enamel, Satin | All painted surfaces | Hard, durable trim finish that resists yellowing | Needs at least two weeks to cure before washing (Sherwin-Williams) | Standard latex trim paint: softer finish for a room that will be used and cleaned |
Materials and Specifications
| Element | Material | Finish / Color |
|---|---|---|
| Stiles and rails | Paint-grade pine | Emerald Urethane Trim Enamel Satin, Pure White SW 7005 |
| Panel fields and backing | MDF | Emerald Urethane Trim Enamel Satin, Pure White SW 7005 |
| Pediment crown and cap | Paint-grade pine molding | Emerald Urethane Trim Enamel Satin, Pure White SW 7005 |
| Column wraps and plinths | Pine and MDF, assembled panel sections | Emerald Urethane Trim Enamel Satin, Pure White SW 7005 |
Project Specs
-
Total run: 86 linear feet of flat-panel wainscoting around the full dining room perimeter
-
Construction: Panels built as single assembled sections with MDF backing, glued and biscuit-jointed
-
Frames: Paint-grade pine stiles and rails
-
Panel fields: MDF
-
Top detail: Pediment crown and cap, stepping out over each column and pilaster
-
Columns: Three paneled column wraps with tall plinths (the base blocks at the floor) and molded caps
-
Front wall: Faux columns built between the windows
-
Paint: Sherwin-Williams Emerald Urethane Trim Enamel, Satin
-
Window terminations: Finished without caulk to the windows, leaving room for custom window treatments
The Craft in the Details
Every section of this wainscoting was built as one piece before it went on the wall: pine frame, MDF backing, glued and biscuit-jointed. A biscuit is a thin, football-shaped wafer of compressed wood glued into matching slots on both pieces. It keeps the pieces aligned during glue-up so the faces come out flush. Glue, tight joinery, the right materials, and careful painting do the rest. Wood still moves with the seasons, but a well-built, glued assembly gives a sunlit room like this its best chance at staying clean and even.
It's the same way we build in the shop. The only difference on this job was where. Hauling 16-foot pre-assembled panels that far wasn't worth the risk, so the crew set up and fabricated on site. That's a big part of why the carpentry took 4.5 days.
And that week, it was 107 degrees. A heat wave hit for seven straight days, right as the crew was cutting, gluing, and assembling in the driveway. Hours of it. Wyatt, Waylon, and Don kept the quality where it needed to be anyway.
One more thing turned up: an abandoned electrical outlet left over from a prior remodel. The crew called in the electrician right away, and that repair was handled as separate work so the wainscoting schedule kept moving.
How Much Does Wainscoting Cost in Rancho Cucamonga?
This project: $12,980
Illustrative Allocation of the $12,980 Investment
These figures are an estimated split of the contracted investment, not invoice line items.
| Scope Item | Illustrative Allocation |
|---|---|
| Layout, on-site mockups, and design refinement with the homeowner | $780 |
| Materials: pine, MDF, pediment crown and cap moldings, glue, biscuits, fasteners | $2,400 |
| On-site fabrication: assembling 86 LF of glued, biscuit-jointed panel sections | $3,900 |
| Installation, including column wraps, faux columns, and window terminations | $2,900 |
| Painting: fill, sand, caulk, and Emerald Urethane Trim Enamel (3 days) | $3,000 |
| Total | $12,980 |
What That Included
-
Full-scale layout and four to five on-site mockups with the homeowner
-
86 linear feet of assembled, glued, biscuit-jointed flat-panel wainscoting
-
Pediment crown and cap around the full room
-
Paneled wraps on all three entry columns, plus faux columns on the front window wall
-
All materials: paint-grade pine, MDF, moldings, and fasteners
-
Three days of painting in Sherwin-Williams Emerald Urethane Trim Enamel, Satin, Pure White
What Was Not Included
-
Electrical work: the repair of an abandoned outlet from a prior remodel was handled separately by the electrician
-
Custom window treatments, installed by others after the wainscoting
-
The chandelier, lighting, artwork, and decor the homeowner has planned for the room
Investment Levels for Wainscoting
These tiers reflect Holland & Sons project history, not market-wide averages.
| Build Level | Investment Range | What You Get |
|---|---|---|
| Entry | $8,000 – $10,000 | Fewer linear feet and a simpler layout |
| Mid (this project) | $10,000 – $18,000 | Full-room perimeter, assembled panels, pediment cap, column wraps |
| Full Custom | $20,000 – $25,000+ | Taller work, raised-panel millwork, or stain grade |
For more on how we set investment ranges, see our pricing page.
Material Upgrade Impact (Illustrative Examples, Not This Project's Contract)
These are illustrative Holland & Sons estimates for a project of comparable scope, not fixed upgrade prices or market averages. Your actual figures depend on your room, layout, and finish choices.
| Material Choice | vs. Budget Alternative | Approximate Investment Impact |
|---|---|---|
| Assembled, glued, and biscuit-jointed panel sections | Picture-frame molding nailed onto drywall | +$2,000 – $3,500 |
| Pine stiles and rails with MDF panels and backing | Pre-made MDF wainscot kit | +$800 – $1,500 |
| Pediment crown and cap | Simple chair-rail cap | +$600 – $1,200 |
| Sherwin-Williams Emerald Urethane Trim Enamel | Standard latex trim paint | +$150 – $300 |
What Moves the Investment
What increases the investment:
-
Taller wainscoting
-
More elaborate raised-panel millwork
-
Stain grade instead of paint grade
What lowers the investment:
- Fewer linear feet: a smaller run of this same design could come in just under $10,000
The Biggest Problems With Wainscoting in Inland Empire Homes
1. Windows that don't match.
Big Inland Empire homes often have a lot of windows, and they're rarely the same size. A standard panel spacing that looks fine on a plain wall falls apart when every sill sits at a different spot. We lay it out full-scale on the real walls, then place every stile so it ends clean at its own window.
2. Light that shows everything.
Rooms with tall ceilings and big windows get sun all day, and raking light finds every open seam, lip, and wavy panel. That's why every section on this job was glued up with biscuits for alignment, then filled, sanded, and painted to a consistent surface. In a room this bright, one small flaw would stand out.
3. Leftovers from earlier remodels.
Once you start covering the lower walls, old work shows up. Here it was an abandoned outlet from a prior remodel. We stop, get the right trade in, and keep the schedule moving instead of burying the problem behind new paneling.
We identify likely layout and installation challenges during design, then verify critical dimensions and details on site before anything is permanently installed. When existing conditions reveal something unexpected, we deal with it before it gets covered up.
Why This Room Works Now
Usability
-
The lower walls now have a durable, wipeable urethane finish instead of bare drywall
-
The room has a finished base ready for the large chandelier and artwork the homeowner has planned
-
The paneled columns clearly mark the transition from the entry hall into the dining room
-
Window terminations were left clean and uncaulked, so the custom window treatments can go in without fighting the trim
The half day of mockups is the part of this job that stuck. Brian and the homeowner stood in the room and tried it four or five different ways until the layout matched the windows instead of the renderings. When it was done, she kept coming back to the same few words.
It looked intentional. It finished the room. It grounded it.
Beauty and Visual Weight
| Element | Before | After |
|---|---|---|
| Visual weight | None at the bottom; 20 feet of blank wall | A solid, finished base under every wall |
| Eye movement | Straight up into empty space | Settles on the paneling, then rises to the windows |
| Room feeling | Huge, empty, unfinished | Grounded and intentional |
Before, the room just went up and up with nothing to hold it. Now it has a floor under it, and it finally feels like it belongs to the rest of the house.
Home Value
According to the National Association of Realtors' 2025 Remodeling Impact Report, 64% of homeowners said they had a greater desire to be in their homes after remodeling, and 46% reported more enjoyment of their living spaces. Finishing the last unremodeled room in a house is exactly that kind of project. Results vary by home, market, and project scope.
The Holland & Sons Angle
On this job, Brian tried something new: an outside designer and a 3D model instead of his own pencil and drafting table. The renderings got approved. The room told a different story.
What saved the design wasn't software. It was standing in the room with the homeowner, mocking it up full-scale, and moving stiles around until every window had a clean answer. That's a judgment call you can only make with the real walls in front of you, and it's why every Holland & Sons layout gets proven on site before anything is fastened for good.
Wyatt, Waylon, and Don were there for all of it: the mockups, the heat, the glue-ups in the driveway. They saw firsthand that the hardest part of this job never shows in the photos. Where a stile lands next to a window, where the cap stops, why nothing gets caulked to the glass. Nobody notices those decisions when they're right.
That's the point.
Learn From This Project: The Smokestone Guides
This project taught us six things worth sharing. Each guide answers one question homeowners ask before they start a project like this one.
-
How Much Does It Cost to Wrap Interior Columns in Wood Paneling?: Holland & Sons column-wrap investment guidance, from simple flat wraps to full-height 20-foot columns.
-
Wainscoting Around Windows: What Goes Wrong and How to Plan It Right: Sill heights, mismatched windows, cap terminations, and planning around window treatments.
-
Picture Frame Molding vs. Assembled Panel Wainscoting: Which Is Worth It?: How the two construction methods differ, and when the extra investment makes sense.
-
Wainscoting and Wall Treatments for Two-Story Rooms: What Actually Works?: A proportion-based framework for rooms with unusually tall ceilings.
-
How to Judge Finish Carpentry Quality: What to Look For Before You Hire: An inspection checklist for finished trim, paneling, and painted millwork.
-
Working With an Interior Designer and a Finish Carpenter: Who Does What?: Roles, field verification, and approvals when a designer and a carpenter share a project.
Wainscoting FAQ
How much does wainscoting cost in Rancho Cucamonga?
At Holland & Sons, full-room custom wainscoting projects generally run $8,000 – $25,000+, depending on linear footage, height, panel style, and paint grade versus stain grade. The Smokestone Wainscoting project was an investment of $12,980 for 86 linear feet with a pediment crown and cap, three paneled column wraps, and painting included. Fewer linear feet can bring a similar job to just under $10,000; taller work, raised-panel millwork, or stain grade pushes it well into the $20,000s.
How long does wainscoting installation take?
This 86-foot dining room took 7.5 working days on site: 4.5 days of carpentry followed by 3 days of painting, with no overlap. There were no separate shop days on this job because all fabrication was done on site. Smaller rooms with fewer windows go faster; more windows, columns, and taller panels add time.
Do I need a permit for wainscoting?
A permit was not required for this project. Decorative interior finish carpentry like wainscoting often doesn't need one, but every city sets its own rules, and any electrical, structural, or wall-opening work can change that. Check with your local building department before you start, and we'll walk through it with you during design.
What's the difference between applied molding and assembled panel wainscoting?
Applied molding is trim nailed directly onto drywall to make picture-frame boxes; assembled panel wainscoting is built as full panel sections with an MDF backing, then installed as a single piece. Assembled panels give you consistent reveals, flatter fields, and tighter joints. On this project every section was glued and biscuit-jointed before it went on the wall. Full guide: Picture Frame Molding vs. Assembled Panel Wainscoting: Which Is Worth It?
What paint should I use on wainscoting?
We finished this project in Sherwin-Williams Emerald Urethane Trim Enamel in satin, color Pure White (SW 7005). It's a water-based, urethane-modified alkyd built for trim, with a hard finish that holds up to cleaning and resists yellowing. Satin gives a soft sheen that doesn't turn every surface into a mirror in a sunny room.
Can wainscoting work around windows that are all different sizes?
Yes, but the layout has to be built around the windows rather than a standard panel spacing. In this dining room every window was a different size, so we mocked up the layout full-scale on site four or five times and placed each stile (the vertical frame piece) to end cleanly at its own window. Full guide: Wainscoting Around Windows: What Goes Wrong and How to Plan It Right
Should wainscoting go in before or after window treatments?
Wainscoting should go in first, with the window treatments planned before the layout is final. On this project the homeowner had custom window treatments coming afterward and didn't want anything caulked to the windows, so every termination at the windows was designed to finish clean without caulk. Full guide: Wainscoting Around Windows: What Goes Wrong and How to Plan It Right
How do I clean painted wainscoting?
Dust it regularly and wash it with mild soap, warm water, and a soft cloth, avoiding abrasive scrubbers and harsh chemicals. Sherwin-Williams recommends waiting at least two weeks after painting before washing so the finish can cure; their guide to cleaning painted surfaces covers the details.
Do you offer financing for wainscoting projects?
Yes, financing is available, on approved credit. Several plan options are available through a third-party lender, and we can walk you through them when we talk about your project at hsconstruct.com/contact.
What areas do you serve near Rancho Cucamonga?
Holland & Sons works throughout the Inland Empire, including Rancho Cucamonga, Eastvale, Corona, Norco, Jurupa Valley, Riverside, Moreno Valley, Lake Elsinore, Menifee, Murrieta, Temecula, Wildomar, Winchester, and Perris. If you're nearby and not on the list, reach out at hsconstruct.com/contact.
Ready to Finish Your Room?
If you've got a big room with bare walls that never quite feels done, that's exactly the kind of space we like to work in. Tell us about it at hsconstruct.com/contact. We'll set up a design meeting, mock up the options with you, and give you a clear investment figure before anything gets built. Financing is available, on approved credit.
We work throughout the Inland Empire, including Rancho Cucamonga, Eastvale, Corona, Riverside, Menifee, Murrieta, Temecula, and Perris. You can also see more finished work at hsconstruct.com/projects.
951-338-8058 | brian@hsconstruct.com | hsconstruct.com | CSLB #1123738
More Than Just Wainscoting
Wainscoting is a signature project at Holland & Sons — but it's one chapter in a much longer story. Brian has been a finish carpenter since 1991, and today his sons build alongside him, which means every room in your home is fair game. If your space needs more than wainscoting, here's what else we build:
-
Kitchen and bathroom remodels — full custom cabinetry, tile work, and finish carpentry from demo to done
-
Coffered ceilings — grid beam systems that add architectural depth to any room, sized and proportioned to the space
-
Wainscoting and wall paneling — classic raised panel, flat panel, board-and-batten, and shiplap applications
-
Reclaimed wood accents — feature walls, fireplace surrounds, and detail work using salvaged material with real character
-
Beam wraps — hollow wood wraps that give exposed beams the look of solid timber without the structural engineering
-
Crown molding, baseboards, and trim carpentry — the details that make a house feel finished, from a single room to a whole home
-
Cased openings and interior door replacements — clean transitions between spaces that most contractors overlook
-
Custom built-in entertainment walls and bookshelves — designed by hand, built in the shop, installed to last
Wood, proportion, and rooms that feel right — that's what we do. hsconstruct.com
About the Author
Brian Holland is the owner and lead carpenter of Holland & Sons Construction, a family-run finish carpentry and general contracting company serving Riverside County and the Inland Empire. He entered the trade at 17 in 1991, learned on the job, and has spent 35 years building the kind of work that makes rooms feel right — often before a homeowner can articulate why. Most projects start at his vintage drafting table, where he sketches the layout by hand with pencil and paper using a Vemco drafting machine before anything gets built. His sons now apprentice alongside him on every project. Brian and Holland & Sons Construction are members of the National Association of the Remodeling Industry (NARI), the National Association of Home Builders (NAHB), and the California Building Industry Association (CBIA). Holland & Sons is based in Perris, CA and licensed by the CSLB (#1123738).
This guide is part of our wainscoting & paneling series.
Learn more about Wainscoting & PanelingHave a project in mind? Let's start a conversation.
Tell us what you are thinking about and we will give you a straight answer about scope, timeline, and investment.
Start a Conversation