What to Know Before You Plan a Built-In Feature Wall with Electric Fireplace (And What Goes Wrong When You Do Not)
Quick Answer
The most common and costly planning mistake in a custom built-in feature wall with an integrated electric fireplace is selecting the fireplace after framing has already started. The chase is built around the specific fireplace dimensions — change the unit after the framing goes up and you are reframing. In Menifee and across the Inland Empire, every new construction wall is also off plumb to some degree, which matters enormously for pattern installation and floor-to-ceiling cabinetry. Getting the sequence right before a board is cut is the difference between a smooth build and an expensive mid-project correction.
Key Takeaways
-
Select your fireplace model and confirm its exact dimensions before framing starts — the chase is built to those dimensions
-
Establish the pattern centerline before the first board is set and protect it through the entire installation
-
New construction walls in Menifee are never perfectly plumb, level, or square — a finish carpenter scribes for every variation
-
Floor-to-ceiling cabinet towers need a tip-in clearance plan — the Liberty Bell units had half an inch at the ceiling
-
The hand-drawn design phase is not optional — it is where sequencing errors get caught before they cost money on site
-
Face frame reveal consistency requires planning at the drafting table, not adjustment on the wall
The Most Common Mistake — And It Happens Before Framing
Here is what goes wrong most often on built-in feature wall projects: the fireplace is selected after the substrate wall is framed.
It sounds like a small thing. It is not. The chase — the framed opening the fireplace recesses into — is built to exact dimensions. Width, height, and depth are all determined by the specific unit. Change the fireplace after the framing goes up and you are rebuilding the chase. In some cases, you are rebuilding the entire substrate wall. That is a day or more of work that did not need to happen.
The fix is simple: select your fireplace model, receive the spec sheet, confirm the rough opening dimensions, and hand that information to your carpenter before framing starts. That is the sequence. It is not complicated. But it requires making a decision at a point when most homeowners are still browsing options.
Brian walks through this in the design phase, before the contract is signed. No surprises mid-job.
What You Are Actually Worried About — And What the Answers Are
-
Permits: Most built-in feature wall projects with electric fireplaces in Menifee do not require a permit when the scope is cosmetic — no structural changes, no new electrical circuits. The Liberty Bell project required no permit. The fireplace plugs into an existing outlet. If new circuits are required, that changes the conversation. Always verify with your local building department before starting work. Holland & Sons advises on this in the design consultation.
-
Electrical: Electric fireplaces plug into a standard 120V outlet or, for some larger units, a 240V dedicated circuit. The Modern Ember Aerus 60" used in the Liberty Bell project is a standard plug-in unit. Verify the power requirements for your specific unit before finalizing outlet placement — and confirm the outlet location relative to the chase before framing.
-
Structural: A built-in feature wall with a substrate pop-out is not structural work — it is finish carpentry on top of an existing wall. No structural engineering required for a standard scope. The OSB substrate wall builds out from the existing drywall to create depth; it does not alter the structure behind it.
-
Cost overruns: Cost overruns on built-in projects almost always trace to sequencing errors — decisions made in the wrong order. The fireplace selected after framing. The cabinet dimensions changed after shop fabrication began. The pattern centerline adjusted mid-installation. Getting the decisions locked in the right order is the single most effective cost control on a project like this.
-
Something looking wrong: The risk here is real, and it is not about the craft — it is about the planning. A chevron pattern with a drifting centerline looks immediately wrong to anyone who walks in the room. Inconsistent face frame reveals telegraph that the carpenter did not plan the build before executing it. These are not errors that happen during installation; they are errors that happen at the drafting table. Or rather — they do not happen when there is a drafting table.
Decision Sequencing: What Must Be Locked In Before Each Phase
This is where most builds go sideways. Here is the correct sequence for a feature wall project:
| Decision | Must Be Locked In Before... |
|---|---|
| Fireplace model and exact rough opening dimensions | Substrate wall framing begins |
| Center panel depth (how far it pops out from the wall) | Substrate wall framing begins |
| Cabinet tower depth, width, and height | Shop fabrication begins |
| Pattern type (chevron, herringbone, straight) | Center panel substrate is up |
| TV mounting height and centerline | Chevron or panel installation begins |
| Cable routing path (in-wall vs. surface) | Center panel installation begins |
| Fireplace height from finished floor | Chase framing begins |
| Face frame specification (reveal width at cabinet and open shelf sections) | Shop fabrication begins |
| Finish specification (full stain-grade vs. mixed painted and stain-grade) | Materials are ordered |
| Hardware selection (pull size, finish, location) | Cabinet doors are ordered |
The New Construction Wall Problem in Menifee
Every new home in the Inland Empire — every one — delivers walls that are slightly off plumb, floors that vary in height across the span, and ceilings that are not perfectly level. For a standard paint job this does not matter. For a floor-to-ceiling built-in with a continuous face frame and a chevron pattern that must track plumb from the floor all the way up, it matters enormously.
What a finish carpenter does that a general laborer does not: scribes (custom-fits) every element to the actual conditions of the room. The cabinet tower that looks perfectly plumb in the final photos is actually shimmed and scribed to a floor that may be 1/4 inch lower on one end than the other. The face frame that looks continuous from the baseboard to the ceiling is cut and fitted to a ceiling that is not perfectly flat. None of this is visible in the finished work. That is the point.
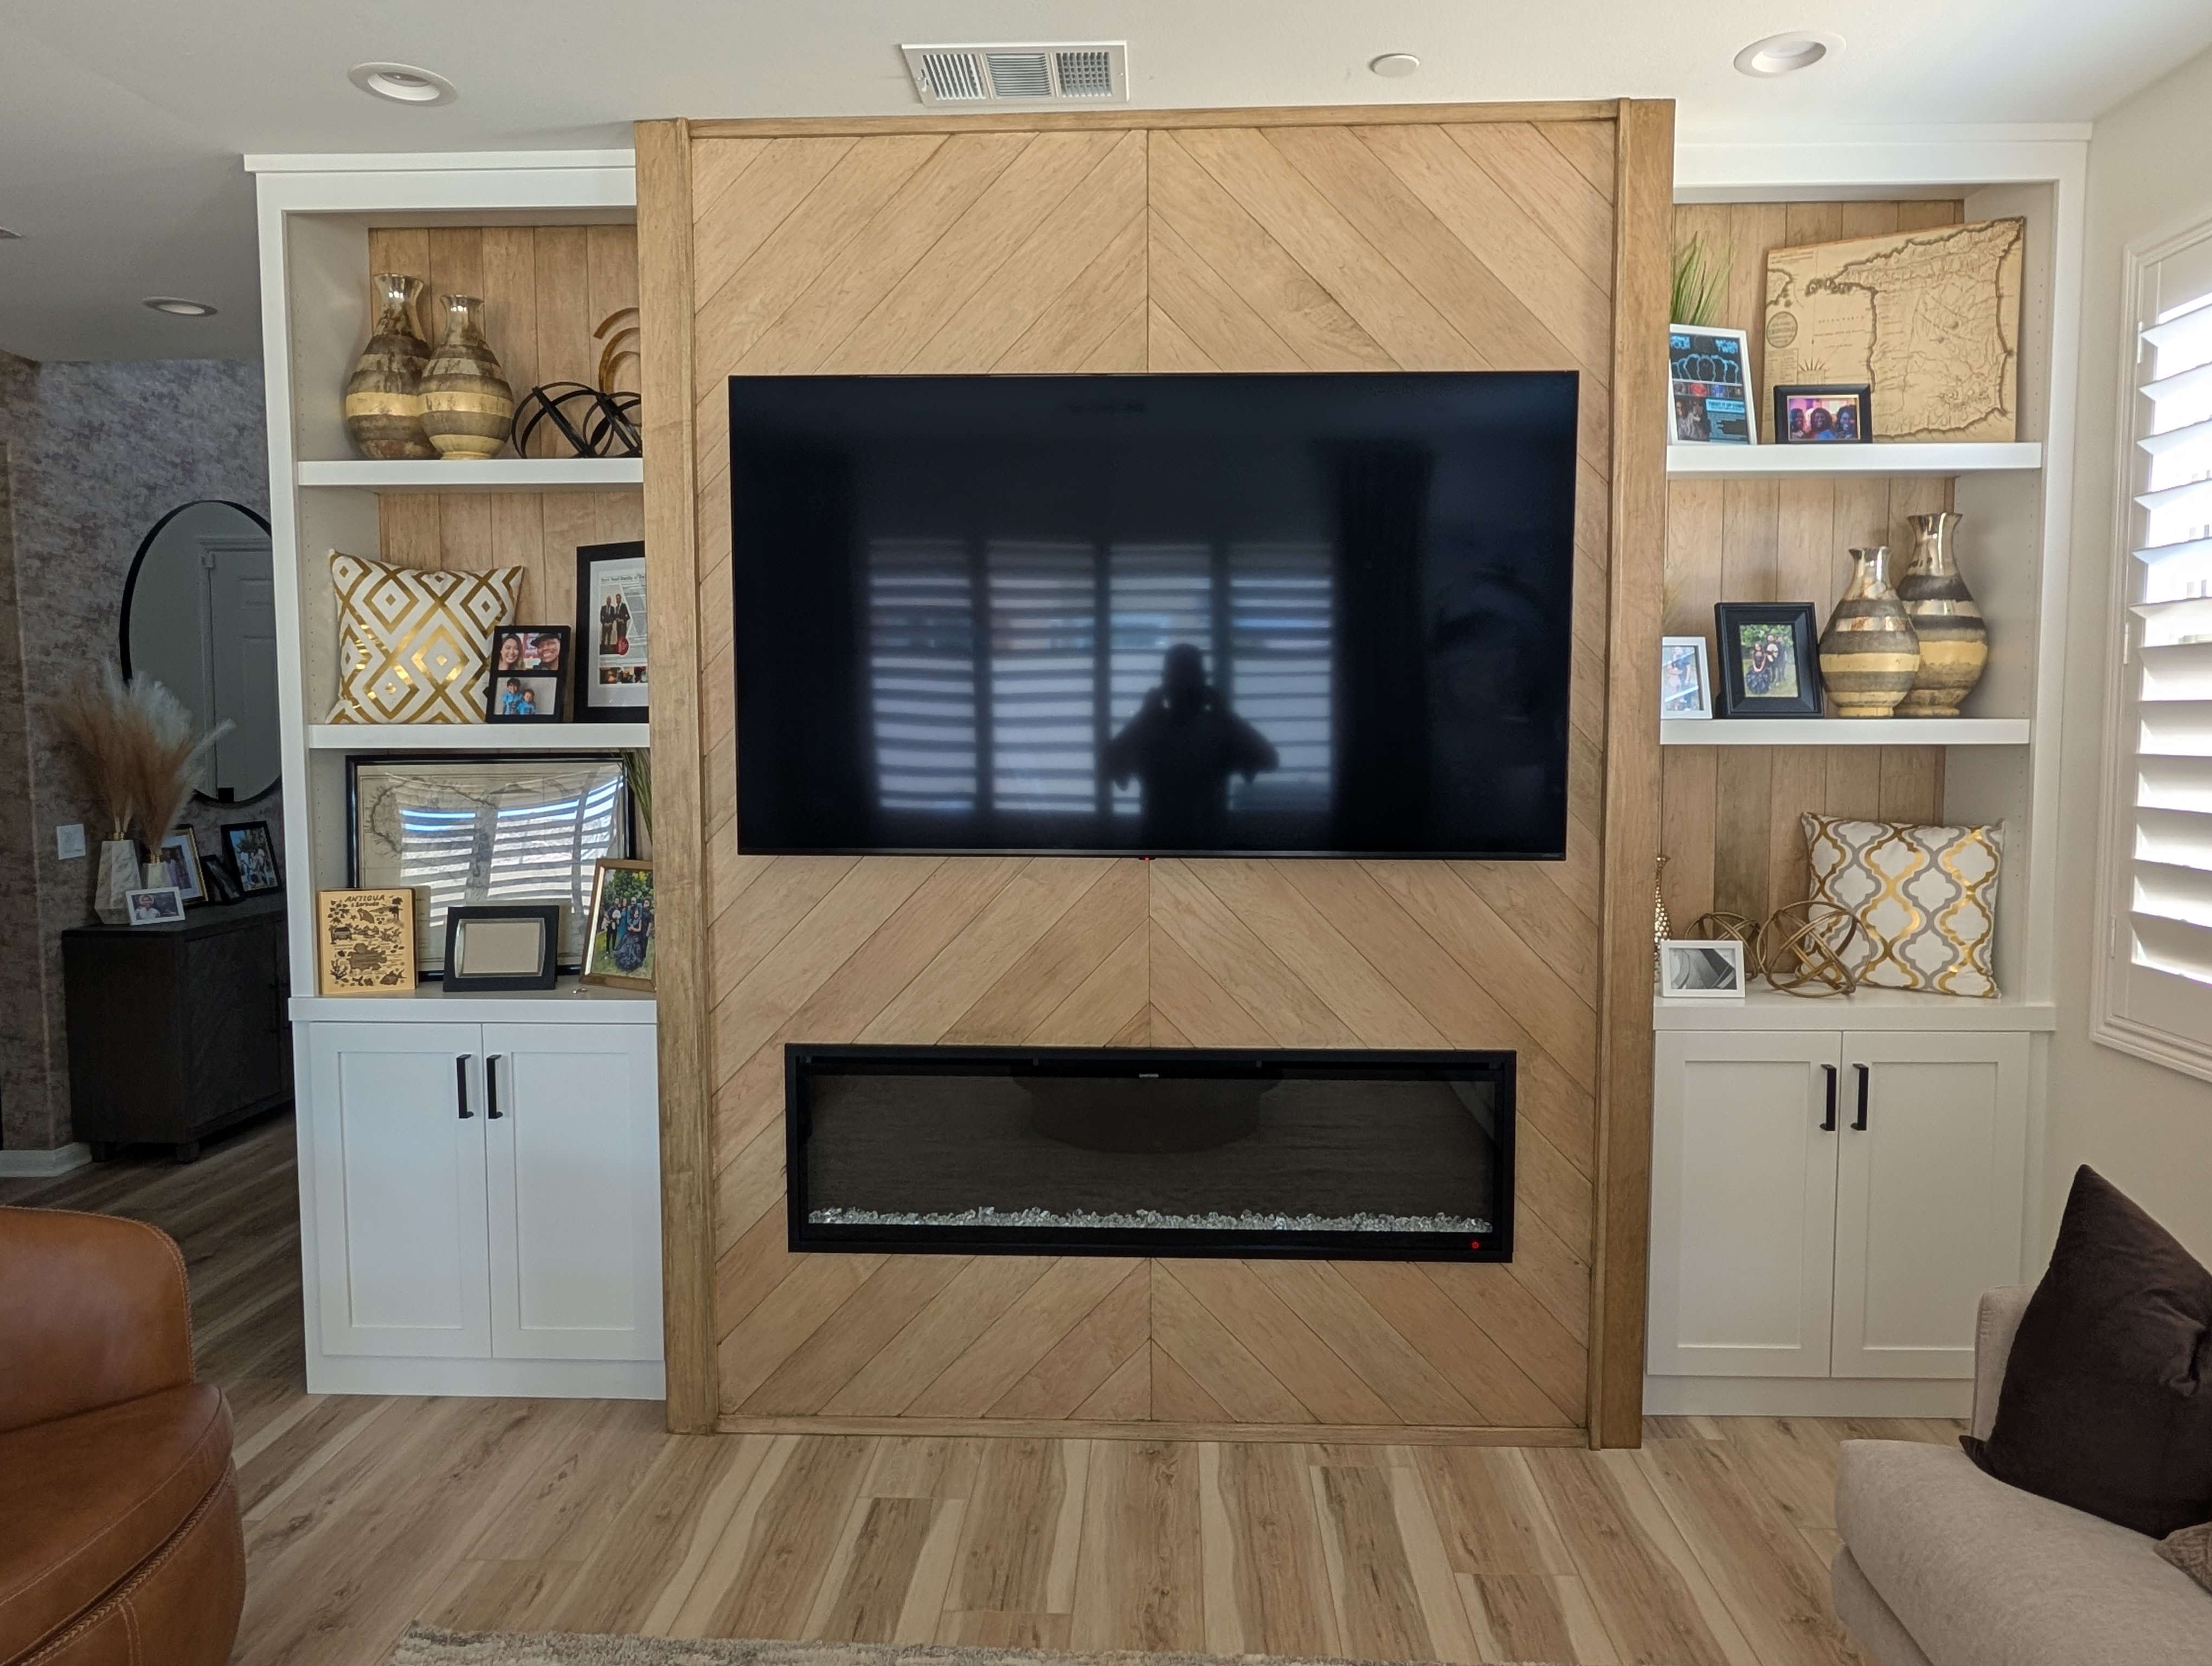
On the Liberty Bell project, the OSB substrate wall established the depth of the center panel before any hardwood was cut. The fireplace chase was framed into that substrate at the confirmed height. The L-trim gap — 3/4 inch on each side between the center pop-out and the cabinet towers — was sized during framing before the cabinets arrived on site. When the cabinets were installed, the L-trim slid in and fit perfectly. Because the drawing said it would.
Common Mistakes — What Goes Wrong and Why
-
Mistake 1: Selecting the fireplace after framing. Already covered above — but worth stating again because it is the most expensive single error on built-in projects. The chase dimensions come from the fireplace spec sheet. Get that sheet before the framing crew shows up.
-
Mistake 2: Skipping the hand-drawn design phase. Every proportional decision on a feature wall — center panel depth vs. flanking cabinet depth, fireplace height from the floor, TV centerline, shelf heights — interacts with every other decision. The only way to see all of those interactions before anything is built is to draw them. Brian has drawn every project at his Vemco drafting table at 3/4" = 1' scale for 35 years. Not because it is required. Because it is how you catch the decisions that cost money before they cost money.
-
Mistake 3: Floating centerline on a chevron or herringbone pattern. A chevron pattern with a centerline that drifts even slightly looks immediately wrong. Both sides of the pattern reference back to that centerline — if it moves, everything moves. Establish the centerline before the first board, verify it is plumb, and protect it through the entire installation. It slows the work down. That is the point.
-
Mistake 4: No plan for floor-to-ceiling cabinet tip-in clearance. A shop-built floor-to-ceiling cabinet unit built to fit wall-to-ceiling has to be tipped into position — which requires clearance to rotate upright. On the Liberty Bell project, the units had half an inch of clearance at the ceiling. Half an inch. Getting both towers into position without touching the drywall above took coordination and a plan executed correctly. The ceiling is untouched. That is not luck.
-
Mistake 5: Inconsistent face frame reveals. The visible reveal — the thin strip of face frame between the door edge and the cabinet opening — should be identical from the bottom of the wall to the top. On the Liberty Bell project, the face frame is physically wider in the cabinet section below and narrower in the open shelf section above, to accommodate full-overlay doors in the lower section. Two different widths. One consistent visual. That required planning at the drafting table and precise execution in the shop.
The Decision Framework: How to Approach This Without Surprises
Lock in these decisions before anything goes to the shop or the site:
-
Select the fireplace. Get the spec sheet. Confirm rough opening dimensions and power requirements.
-
Agree on center panel depth. That drives the substrate wall build-out, which drives the L-trim gap, which drives cabinet placement.
-
Finalize cabinet dimensions. Height, depth, and width of each tower must be confirmed before shop fabrication begins.
-
Choose the pattern. Chevron requires a perfectly plumb centerline and angle cuts on every board. Straight planking does not. Make that decision before materials are ordered.
-
Confirm finish specification. Mixed stain-grade and painted vs. full stain-grade. This drives material ordering and shop finishing sequence.
-
Draw it. Every decision above interacts with every other decision. Draw the elevation and the bird's-eye plan before a single board is cut.
See This In Action — The Liberty Bell Project, Menifee, CA
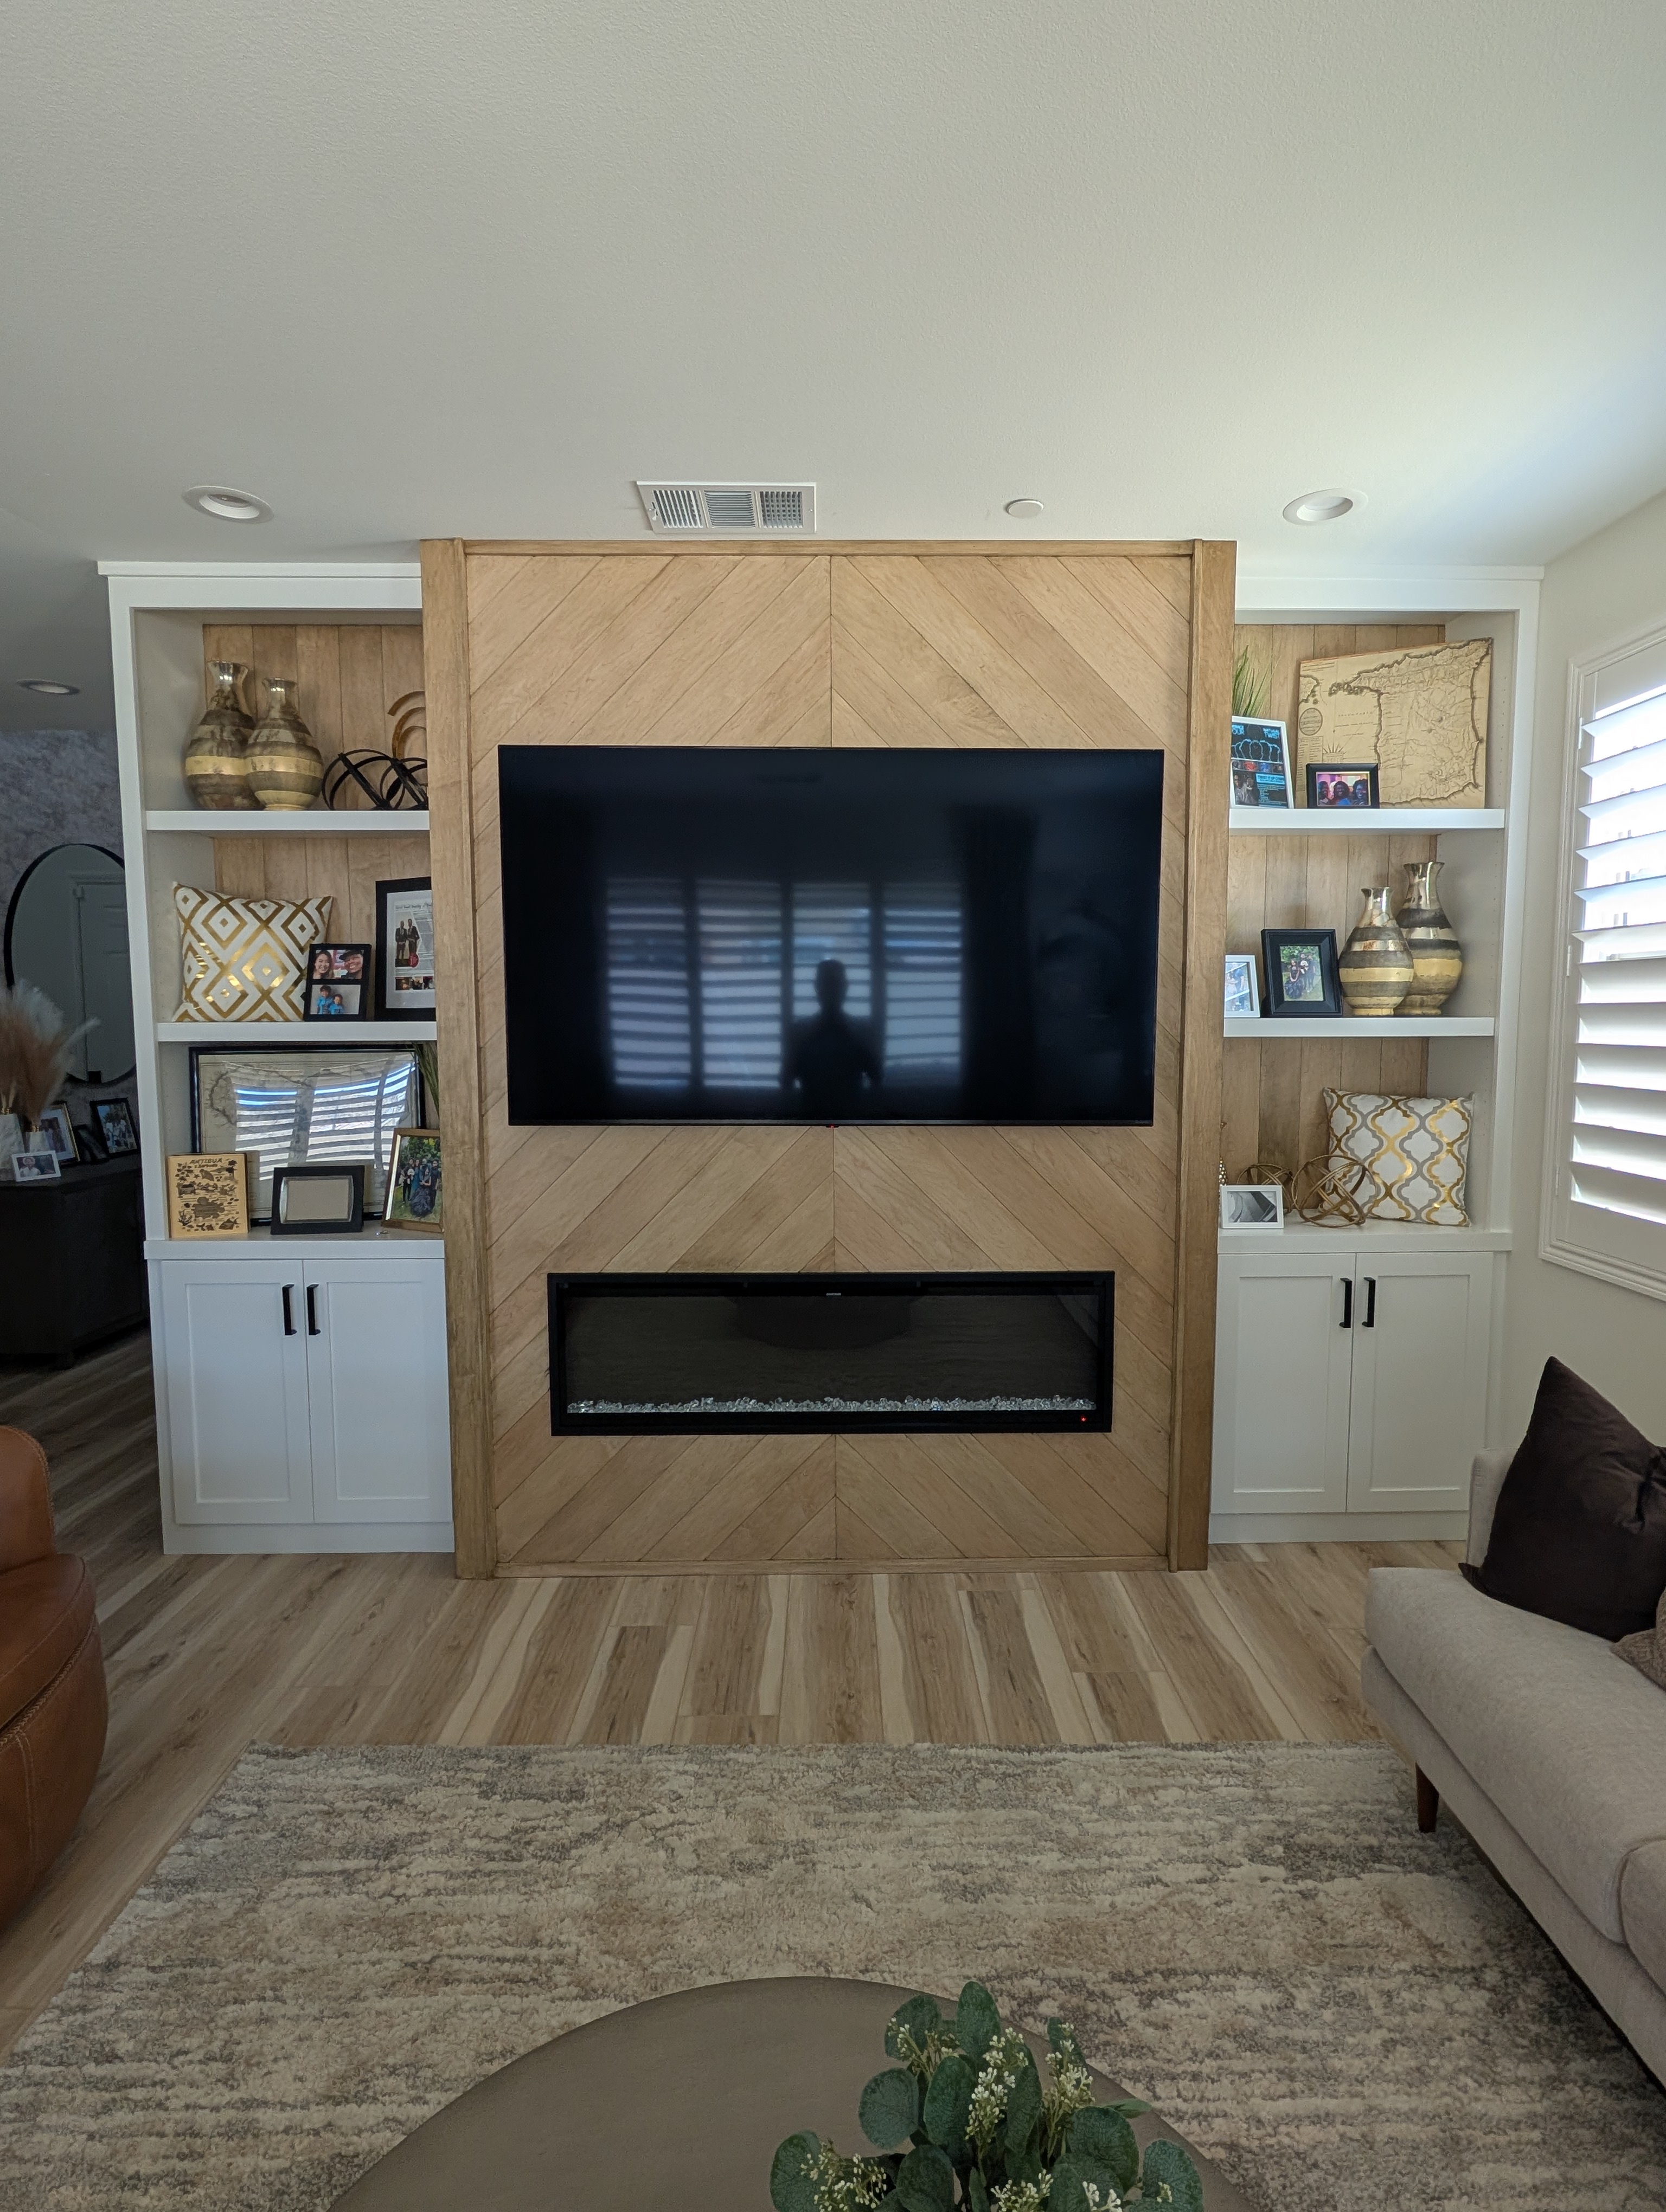
On the Liberty Bell project, the planning sequence was followed exactly. Brian drew the full wall at 3/4" = 1' scale — elevation and bird's-eye plan — before any materials were purchased. The elevation locked in the fireplace height at 12" from the finished floor, the TV centerline at 62", the depth of the center pop-out at 20", and the cabinet tower depth at 16". The bird's-eye plan confirmed the L-trim gap of 3/4" on each side.
What was confirmed before framing started on this project:
-
Modern Ember Aerus 60" selected and spec sheet confirmed — rough opening dimensions locked in
-
Center panel depth set at 20" proud of the flanking cabinet units — framing built to that spec
-
Cabinet tower dimensions finalized — shop fabrication began with confirmed dimensions
-
Chevron pattern confirmed — centerline established and verified plumb before the first board was set
-
L-trim gap sized at 3/4" during framing — before cabinets arrived on site
DIY Assessment: Where This Work Starts, and Where Most Homeowners Hand It Off
Some of this work is accessible to an experienced DIYer. Basic substrate framing with OSB and 2x4 or 2x6 lumber is straightforward carpentry. A simple horizontal or vertical plank installation on the center panel is manageable. Placing a plug-in electric fireplace into a pre-framed opening is well within DIY range.
Where the work shifts: the chevron or herringbone pattern. Every board is angle-cut at 45 degrees on both ends. The centerline must be established perfectly plumb and protected through the installation. Small errors compound — a centerline that drifts 1/8 inch per foot looks dramatically wrong by the time you reach the ceiling. This is the kind of work that takes twice as long as it looks like it should, and where 35 years of finish carpentry experience is not decorative.
Floor-to-ceiling shop-built cabinet and bookshelf towers require shop fabrication capability — a table saw, a drill press, a finish-grade shop environment, and the experience to build face frames with consistent reveals. This is not a job site assembly task. The Liberty Bell cabinet towers were built as complete floor-to-ceiling units in-house over two days before they ever touched the site.
The honest answer: most homeowners can do the planning and material research. The precision installation — pattern, cabinetry, face frames, trim details — is where most hand it off.
The Holland & Sons Angle
The original drawing for the Liberty Bell project established the 3/4" L-trim gap during the framing phase — before the cabinet towers were even in the shop. That gap had to be exactly right. Too wide and the trim floats visibly away from the surface. Too narrow and the trim does not fit. The substrate wall was framed to hit that gap within 1/16". The cabinets arrived on site. The L-trim slid home perfectly. Because the drawing said it would — and the framing hit the number.
That level of precision is not instinct. It is sequencing — making every decision in the right order, at the right phase, before the next phase locks it in. Thirty-five years of doing this teaches you that the mistakes do not happen on the wall. They happen at the drafting table, or rather — they do not happen when you use one.
Brian's sons worked both cabinet towers into the ceiling on install day. Half an inch of clearance. Drywall untouched. That is the next generation learning what locked-in planning actually produces — not a concept, but a ceiling they can point to.
Frequently Asked Questions
Do I need a permit for a built-in feature wall with an electric fireplace in Menifee, CA?
Most built-in feature wall projects with electric fireplaces in Menifee do not require a permit if the scope is cosmetic — no structural changes, no new electrical circuits. The Liberty Bell project required no permit. Permit requirements vary by jurisdiction and scope; always verify with your local building department before starting work. Holland & Sons advises on this during the design consultation.
What decisions must be locked in before framing starts?
Fireplace model and exact rough opening dimensions must be confirmed before the chase is framed. Center panel depth must be established before the substrate wall goes up. Cabinet tower dimensions must be finalized before shop fabrication begins. TV mounting height and cable routing path must be planned before the panel is installed. Pattern centerline must be established and verified plumb before the first board is set.
Can I install a TV above an electric fireplace in a built-in?
Yes — and it is one of the most common configurations in a custom built-in. Electric fireplaces produce far less heat than gas or wood-burning units. A recessed linear electric fireplace in a built-in chase directs heat output forward, not upward. The Liberty Bell project has the TV mounted above the Modern Ember Aerus 60-inch fireplace with no heat management issues. Always verify clearance requirements in your specific fireplace unit installation guide.
Does a new construction home need scribing for a built-in?
Yes. Every new home in Menifee has walls slightly off plumb, floors that vary in height across the span, and ceilings not perfectly level. For a floor-to-ceiling built-in with a continuous face frame and a pattern that must track plumb from floor to ceiling, this matters enormously. A finish carpenter scribes and accounts for every variation before anything is fastened. The result looks like the house was built around the wall unit — because effectively, it was.
How far in advance should I select the electric fireplace insert?
Before framing starts. The fireplace model must be selected and its exact dimensions confirmed before the chase is framed. On the Liberty Bell project, the Modern Ember Aerus 60-inch was selected before the OSB substrate wall went up. That decision drove the chase dimensions, the fireplace height from the floor, and the surrounding panel proportions. Changing the fireplace after framing means reframing.
Can I DIY a built-in feature wall with an electric fireplace?
Some elements are accessible to experienced DIYers — basic substrate framing, simple horizontal or vertical plank installation, and placing a plug-in electric fireplace into a pre-framed opening. The chevron pattern installation, floor-to-ceiling shop-built cabinetry, face frame continuity, and L-trim corner details require finish carpentry experience and shop fabrication capability. The point where most homeowners hand it off is the shop fabrication of the cabinet towers and the pattern installation.
What is in-wall cable management and why does it matter?
In-wall cable management routes TV and AV cables through the wall cavity rather than surface-mounting them. On the Liberty Bell project, a recessed media plate was installed behind the chevron panel in the TV zone, concealing all cable routing completely. The alternative — surface-mounted wire channels or visible cables running across the feature panel — would undermine everything the wall is trying to do visually. Plan the cable routing path before the panel installation begins, not after.
What is the biggest planning mistake on built-in feature wall projects?
Selecting the fireplace after framing has started. The chase is framed to the specific unit dimensions — width, height, and depth. Changing the fireplace after the framing goes up means reframing the chase, which is a day or more of work that did not need to happen. The fix is simple: get the spec sheet, confirm the rough opening dimensions, and hand that information to your carpenter before framing begins.
Start Your Project
If you have a wall that needs something real — and you want to get the planning right from the start — this is the conversation Holland & Sons is built for. Hand-drawn design, sequenced correctly, no surprises mid-job.
Ready to talk about your project? Start here: <span class="underline">hsconstruct.com/contact</span>
We serve Menifee, Murrieta, Temecula, Perris, Riverside, and the greater Inland Empire. Follow the work at @hollandandsonsconstruction.
951-338-8058 | brian@hsconstruct.com | hsconstruct.com | CSLB #1123738
More Than Just Feature Walls
Planning is where every Holland & Sons project begins — and it applies to every room in the house. Brian and his sons have been finish carpenters since 1991, which means every room in your home is fair game.
If your space needs more than a feature wall, here is what else we build:
-
Kitchen and bathroom remodels — full custom cabinetry, tile work, and finish carpentry from demo to done
-
Coffered ceilings — grid beam systems that add architectural depth to any room, sized and proportioned to the space
-
Wainscoting and wall paneling — classic raised panel, flat panel, board-and-batten, and shiplap applications
-
Reclaimed wood accents — feature walls, fireplace surrounds, and detail work using salvaged material with real character
-
Beam wraps — hollow wood wraps that give exposed beams the look of solid timber without the structural engineering
-
Crown molding, baseboards, and trim carpentry — the details that make a house feel finished, from a single room to a whole home
-
Cased openings and interior door replacements — clean transitions between spaces that most contractors overlook
-
Custom built-in entertainment walls and bookshelves — designed by hand, built in the shop, installed to last
Wood, proportion, and rooms that feel right — that is what we do.
<span class="underline">hsconstruct.com</span>
About the Author
Brian Holland is the owner and lead carpenter of Holland & Sons Construction, a family-run finish carpentry and general contracting company serving Riverside County and the Inland Empire since 1991. He entered the trade at 17, learned on the job, and has spent 35 years building the kind of work that makes rooms feel right — often before a homeowner can articulate why. His sons now apprentice alongside him on every project. Holland & Sons is based in Perris, CA and licensed by the CSLB (#1123738).
This guide is part of our custom fireplace walls series.
Learn more about Custom Fireplace WallsHave a project in mind? Let's start a conversation.
Tell us what you are thinking about and we will give you a straight answer about scope, timeline, and investment.
Start a Conversation