The Hidden Layer: Backing, Substrate, and Mounting Behind a Reclaimed Wood Wall in the Inland Empire
| Quick Answer: Behind a reclaimed wood wall, a finish carpenter installs a solid substrate — MDF or plywood fastened to the studs — that the wood attaches to, often painted matte black so gaps between irregular boards read as shadow instead of bright drywall. Solid floating shelves mount on concealed steel rods anchored into framing, not into the wall surface. The hidden layer is invisible in the finished room, but it determines whether the wall looks clean and lasts. Plan it before the first board goes up. |
Key Takeaways
-
A solid substrate (MDF or plywood) behind the wood gives reliable fastening and controls how the finished wall reads.
-
Painting the backing matte black turns gaps between irregular boards into shadow lines — a cheap move with outsized impact.
-
Solid floating shelves hold weight because concealed steel rods anchor into framing — drywall anchors alone can't do it.
-
MDF suits a flat painted base; plywood is better where strength or moisture matters. Brian has built this layer across Riverside County since 1991.
Almost everything written about reclaimed wood walls is about the wood you can see. This guide is about the layer you can't — the backing, the substrate, and the mounting hardware hidden behind the finish. It's the part homeowners never think to ask about, and it's the part that quietly determines whether the wall looks clean, stays put, and lasts.
Here's the thing experienced finish carpenters know: a reclaimed wood wall is only as good as what's behind it. The right substrate gives you something solid to fasten into anywhere on the wall. The right backing color makes the difference between gaps that look intentional and gaps that look like mistakes. The right mounting hardware is what lets a heavy solid-wood shelf appear to float with no visible support. Get the hidden layer wrong and no amount of beautiful wood saves the result.
Brian Holland has been building this layer into walls across Norco, Menifee, Temecula, and the wider Inland Empire since 1991. This guide walks through each part of it — substrate choice, the matte-black backing trick, MDF versus plywood, and how floating shelves actually carry their load.
Why the Hidden Layer Exists
Start with the problem it solves. Drywall is a poor surface to build a wood wall on. It won't reliably hold fasteners except where studs fall, it can't carry the weight of solid wood or shelves, and its bright white face shows through any gap between boards. So before the visible wood goes up, a finish carpenter creates a better surface to build on. That's the hidden layer: a planned, solid base that fixes all three of those problems at once.
The Substrate — What the Wood Attaches To
The substrate is a sheet material — typically MDF or plywood — fastened over the drywall and into the studs, giving you continuous solid backing across the whole wall. With a substrate in place, you can fasten the wood anywhere rather than hunting for studs, the weight of the wood is fully supported, and you have a uniform surface to control the finished look. The alternative approach uses furring strips — thin wood strips fastened at intervals — to create level fastening points and, on uneven or masonry walls, a true mounting plane. Both are legitimate. The principle that matters is the same: build on a solid, planned base, never improvise into bare drywall.
| Backing Approach | When It's the Right Call |
| Full substrate sheet (MDF/plywood) | Continuous backing; fasten anywhere; paint dark to hide gaps |
| Furring strips | Level an uneven wall; add an air gap; fasten over masonry |
| Direct to drywall | Only thin, lightweight panels — not solid wood or shelves |
MDF vs. Plywood for Backing
This is the substrate question homeowners ask most, so here's the straight comparison — scoped specifically to backing behind a wood wall, not cabinet construction. Both work; they're suited to different jobs.
| Factor | MDF Backing | Plywood Backing |
| Surface | Dead-flat, smooth — paints beautifully | Good, but grain can telegraph |
| Fastener holding | Decent in field; weak near edges | Strong throughout |
| Moisture tolerance | Poor — avoid in damp areas | Better — handles humidity |
| Weight / handling | Heavier sheet for sheet | Lighter for its strength |
| Best behind | Painted backing on a dry, decorative wall | Shelves, heavier loads, or any moisture |
The practical rule: choose MDF when you want a perfectly flat surface to paint dark behind a decorative wall in a dry room — that's the matte-black backing job, and MDF excels at it. Choose plywood when the backing has to hold more fastener load, sit in a space with any moisture, or support heavier elements. On the Broken Twig project, MDF was the right call for the painted backing behind the barn wood, because the dining room is dry and the backing's job was to be flat and black, not to carry load.
The Matte Black Backing Trick
This is the single best-kept secret in rustic wood walls, and it costs about a gallon of paint. Reclaimed boards are irregular by nature, so here and there a hairline gap opens between aged planks. On a white or raw substrate, those gaps flash bright — your eye catches the drywall behind the wood and the whole wall reads cheap. Paint that same substrate flat black, and the identical gap becomes a shadow line, like it was designed that way. The gap doesn't disappear; it stops looking like a mistake.
This isn't a niche pro trick, either — DIY installers discover the same lesson constantly, reporting that a darker color behind the planks is what saves the look when seams show through. The difference between a homeowner stumbling onto it and a finish carpenter is that the carpenter plans it from the start: the backing goes up and gets painted before a single board of the expensive wood is touched. It's a small decision that protects the most costly part of the whole wall.
How Floating Shelves Actually Mount
A solid floating shelf looks like it defies physics — a heavy slab projecting from the wall with no visible support. The trick is entirely in the hidden mounting. Heavy-duty steel rods (or a steel bracket) anchor into the wall framing — studs or solid blocking, never just drywall. The shelf, if it's solid stock, is then precision-bored so those rods slide deep inside it. The load travels from whatever sits on the shelf, into the slab, onto the steel, and back into the framing. The wall surface holds nothing; the structure does.
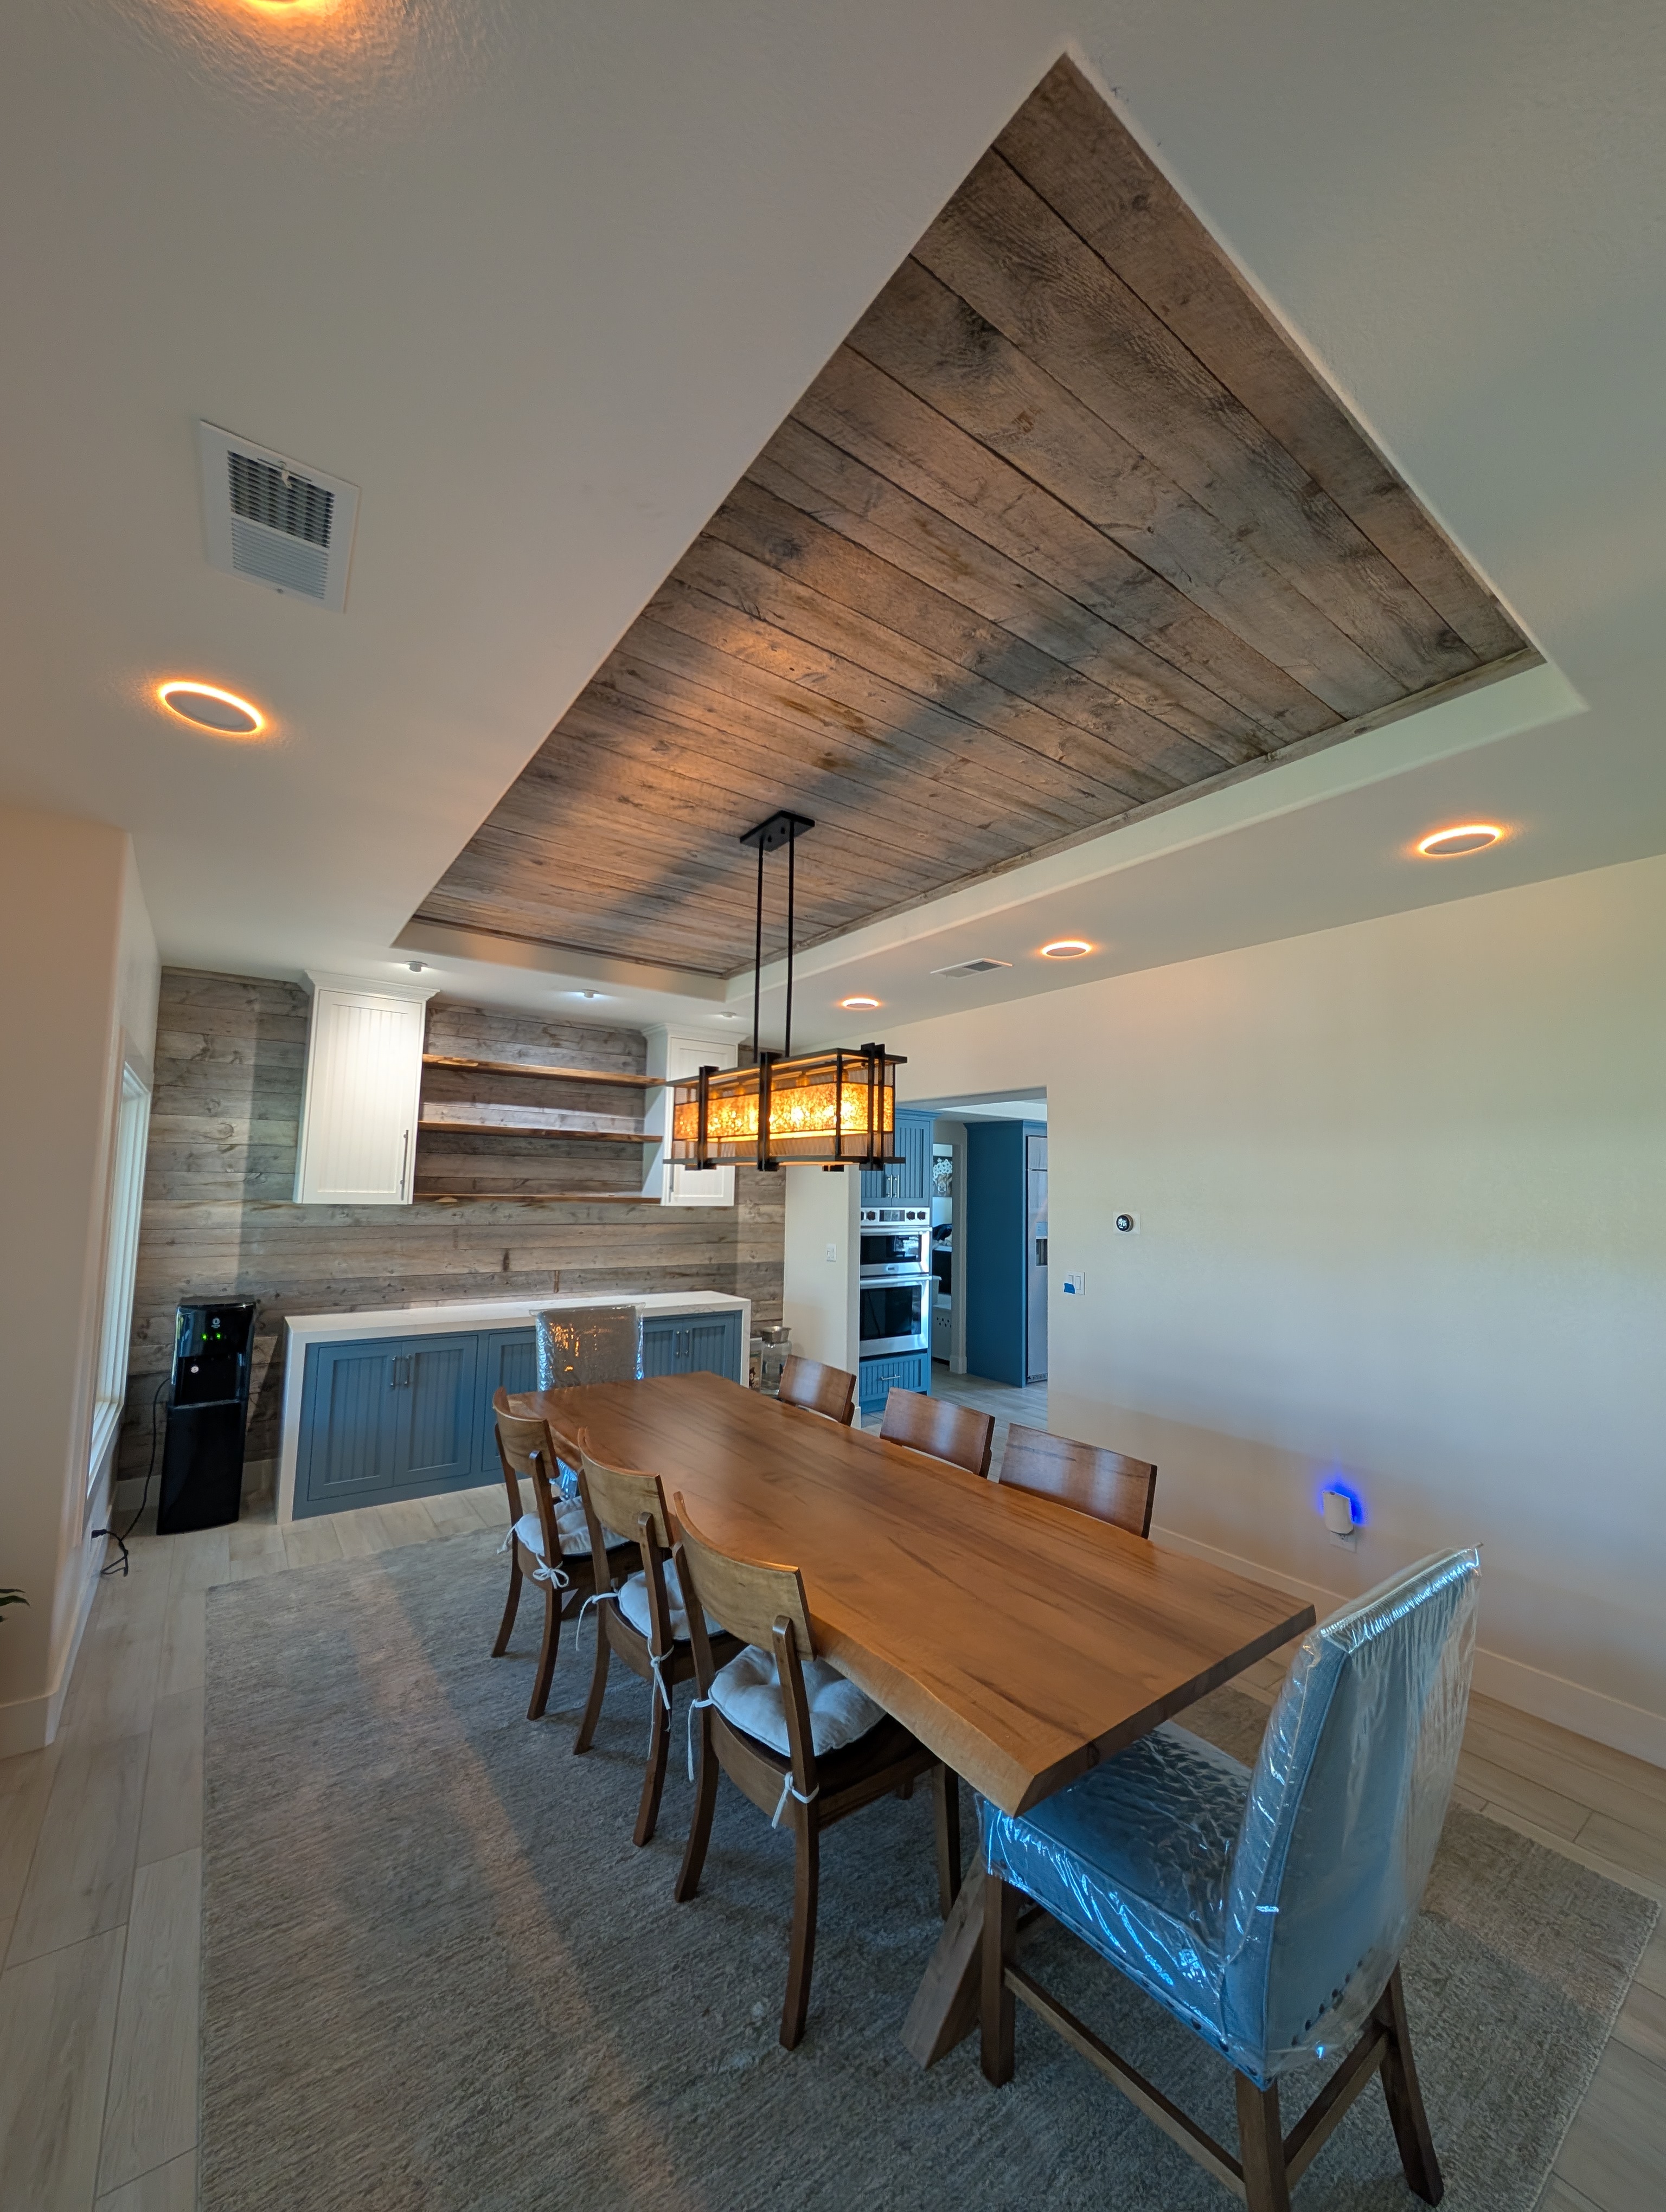
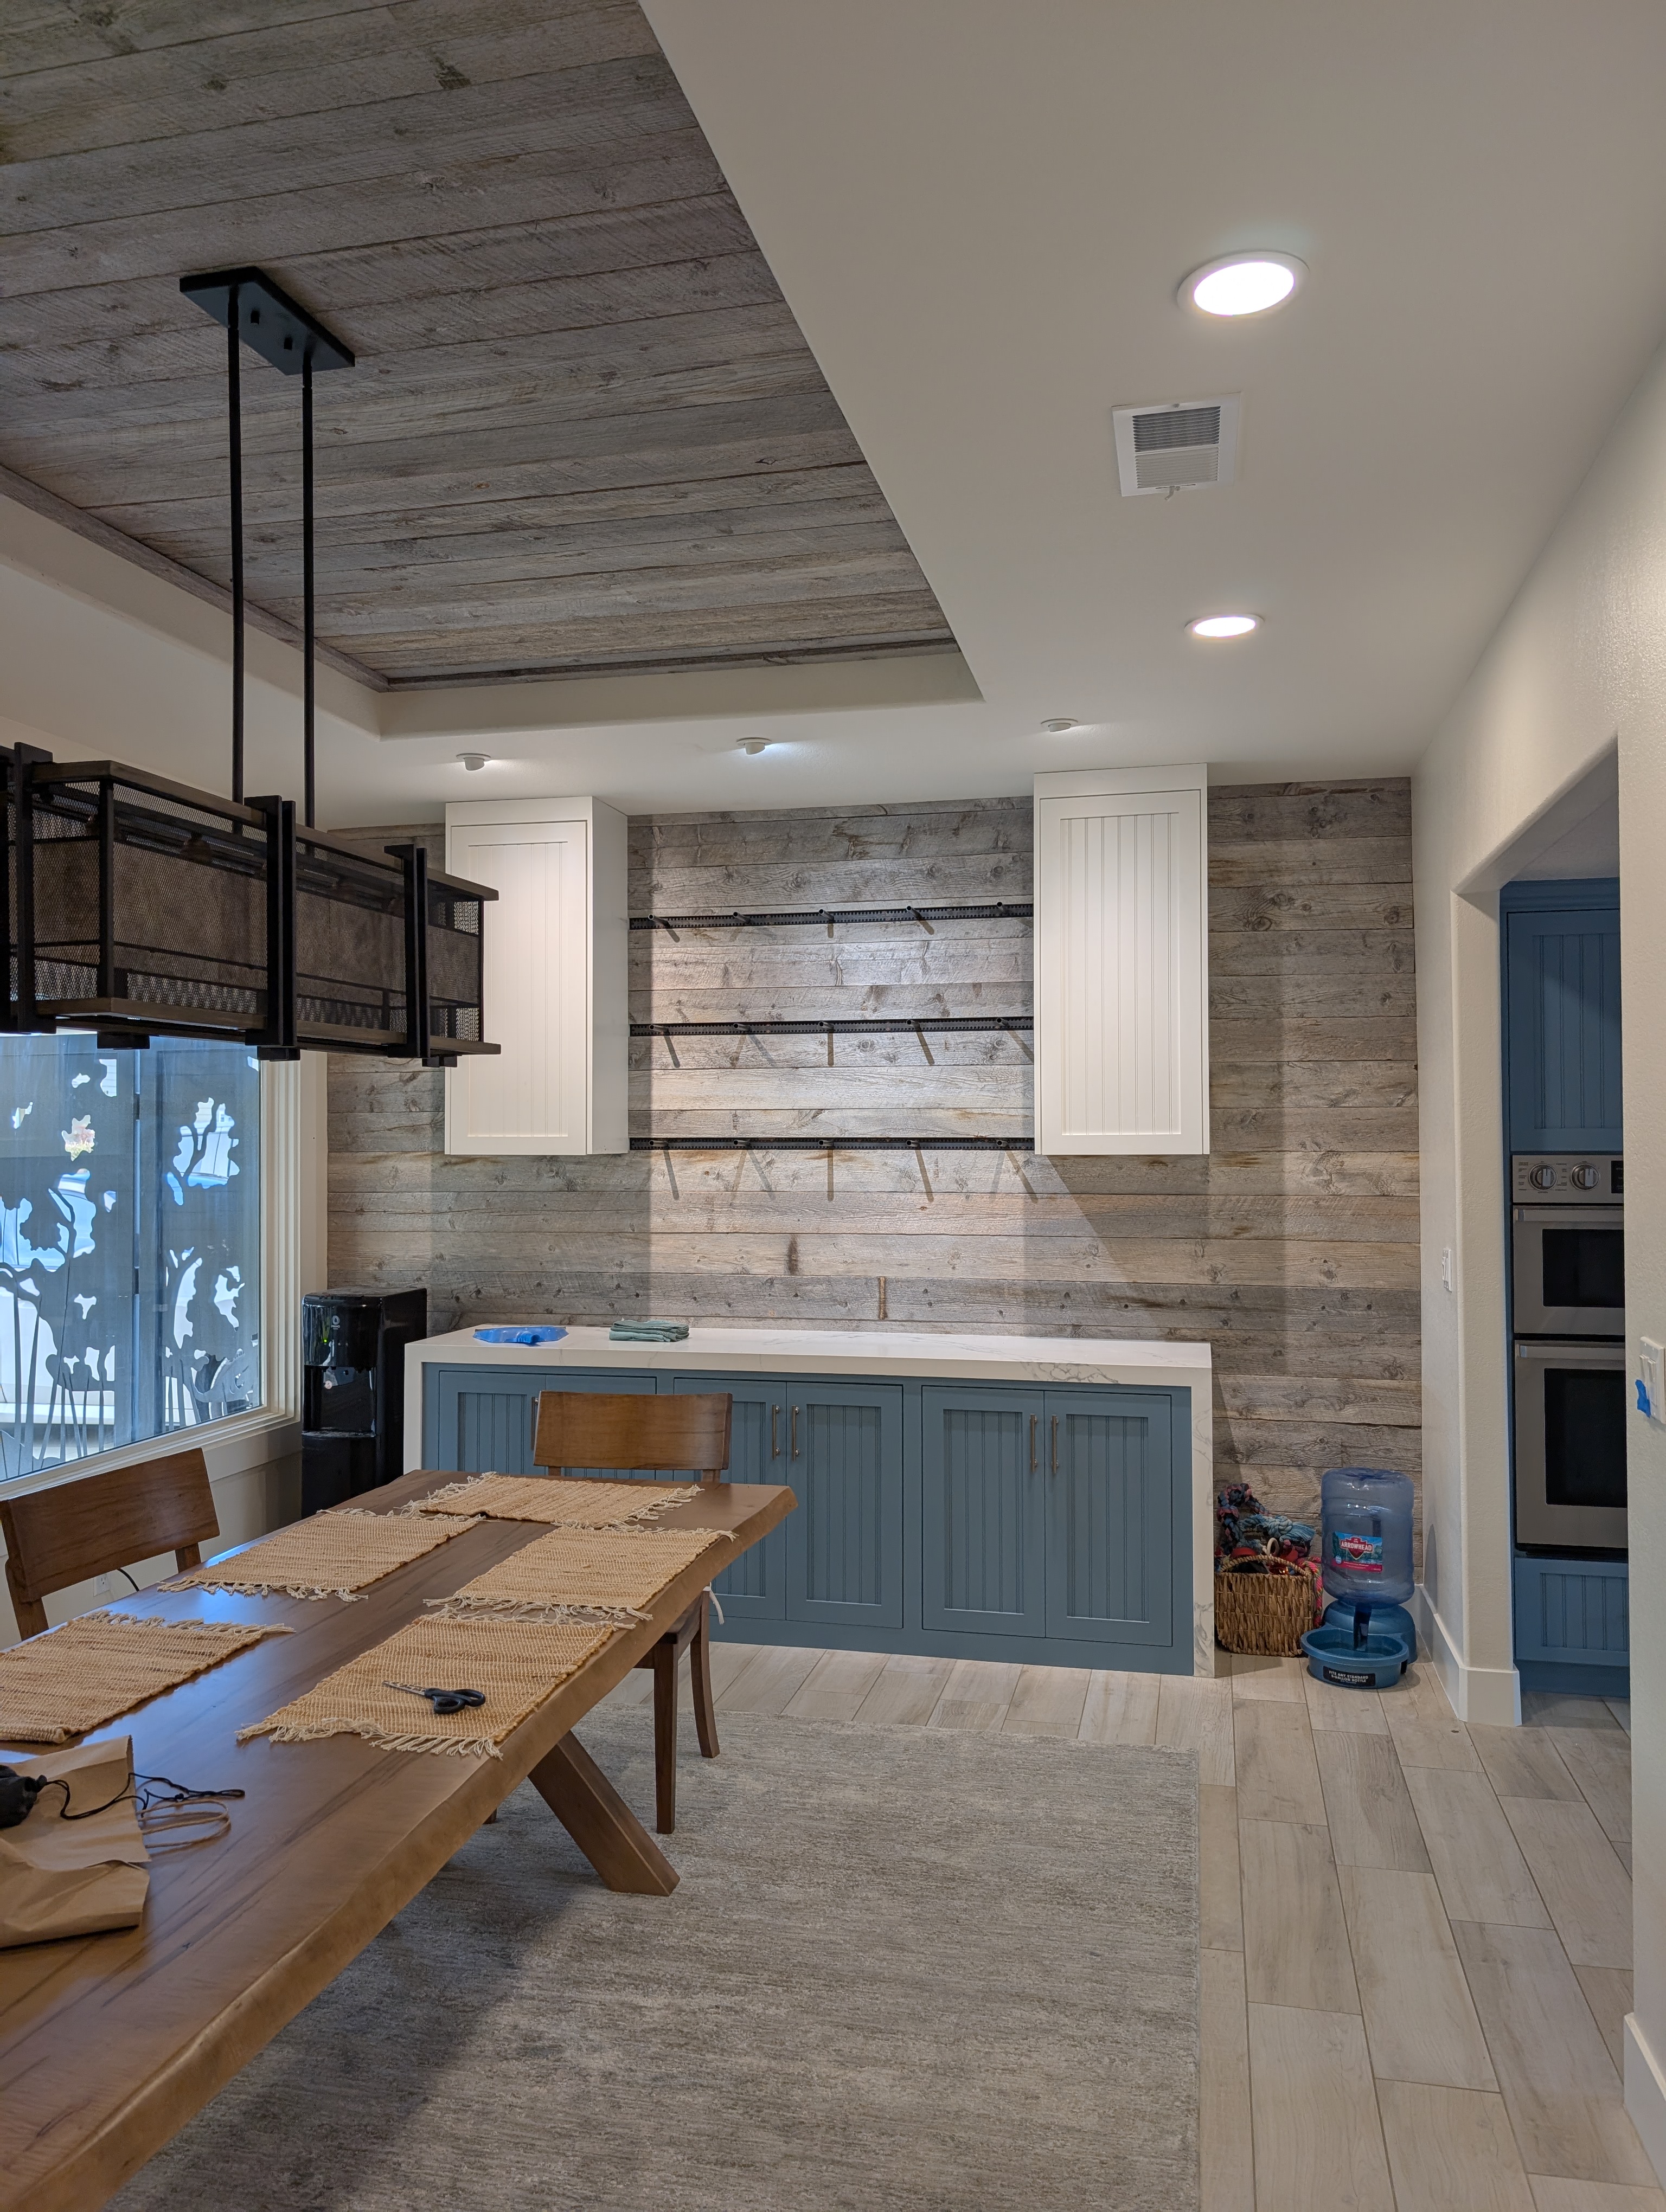
Two things make this work. First, the mounting must reach framing — this is why a solid-wood shelf can't hang on drywall anchors alone, and why the wall's structure has to be considered before the shelf is designed. Second, the shelf needs enough thickness to both conceal the rods and resist sagging over its span. A thin shelf can't hide the hardware or carry the load; a 2-inch solid slab can do both. On the Broken Twig project, the live-edge walnut shelves were bored to slide onto concealed heavy-duty steel rods anchored into the wall — genuine floating shelves with no visible bracket anywhere.
| Load Path Element | Its Job |
| Item on the shelf | The load to be supported |
| Solid wood slab | Carries the load; conceals the steel |
| Concealed steel rods | Transfer the load to framing |
| Wall studs / blocking | Anchor point — where the weight actually goes |
The Decision Framework for the Hidden Layer
Plan the layer behind the wood with these three calls:
-
Pick the substrate to match the room. MDF for a flat painted base in a dry room; plywood where you need fastener strength, moisture tolerance, or shelf support.
-
Paint the backing dark before the wood goes up. On any rustic wall with irregular boards, a matte black backing turns gaps into shadow. Do it first, not after.
-
Anchor heavy elements to framing. Solid shelves and built-ins must reach studs or blocking. Decide where the load goes before designing the piece, not after.
See This In Action — The Broken Twig Project, Norco
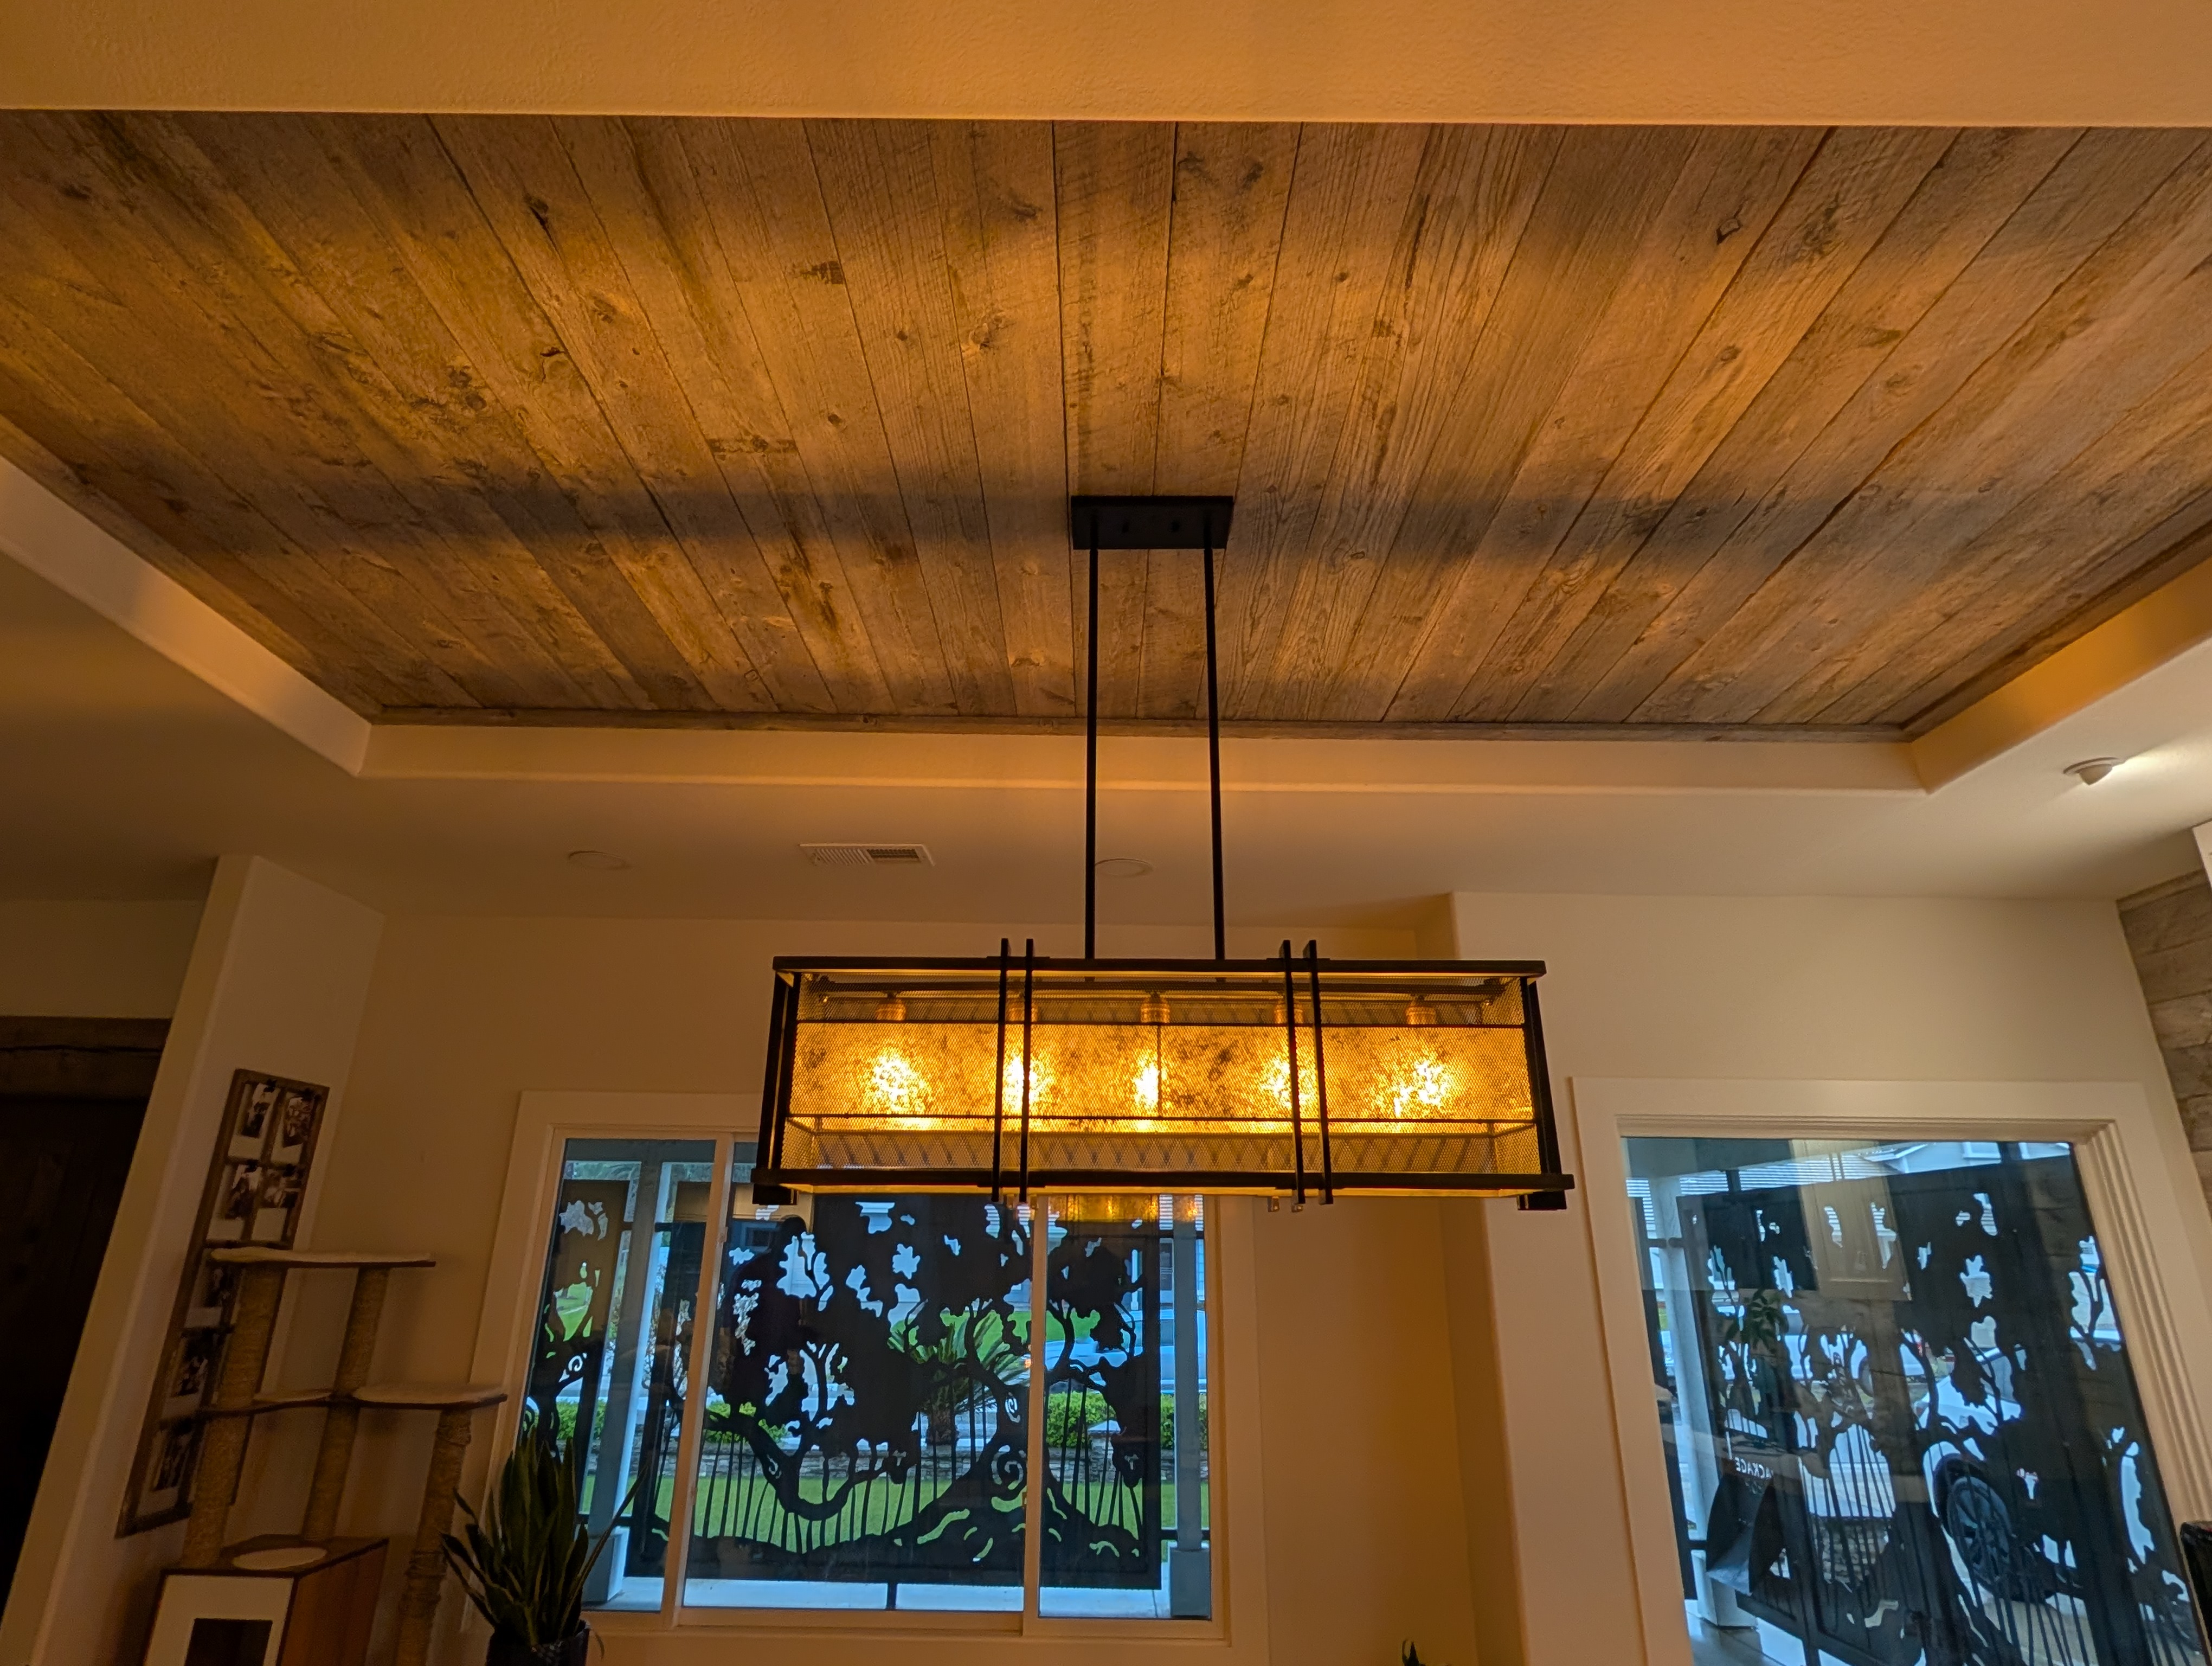
If you want to understand the hidden layer, look at the Broken Twig wall before any barn wood went on it: the entire wall and ceiling tray were sheeted in MDF and painted flat black. That black surface is invisible in every finished photo — and it's the reason the irregular century-old planks read clean instead of cheap. Every natural gap between aged boards became a shadow line rather than a flash of drywall. It's the clearest possible example of spending effort where it doesn't show so the part that shows looks effortless.
What we used on this project:
-
Half-inch MDF backing on the wall and ceiling tray, painted matte black before any barn wood went up.
-
Heavy-duty steel rods anchored into the wall for the floating shelves.
-
Live-edge walnut slabs precision-bored to slide onto the concealed steel.
-
A planned, solid base behind every visible board — no improvising into drywall.
Regional Performance Note
In the dry Inland Empire, MDF backing performs well on interior walls because there's little ambient moisture to swell it — which is part of why it was the right choice for the dry Norco dining room. The caution is local but real: any wall near a kitchen sink, a bathroom, or an exterior wall prone to condensation is a place to favor plywood backing instead, since MDF degrades fast if it ever gets wet. Our big temperature swings don't trouble a properly fastened substrate. And because so many Inland Empire homes are builder-grade tract houses with predictable stud spacing, finding solid framing for shelf mounting is usually straightforward — though a stud finder and a moment of planning still beat assuming.
The Holland & Sons Angle
If you want to understand how Brian thinks, look at the matte black layer nobody will ever see. The instinct behind it is the whole Holland & Sons philosophy in one decision: spend the effort where it doesn't show, so the part that does show looks effortless. Painting a substrate black is invisible, unglamorous work that adds a step to the schedule. It also happens to be what protects thousands of dollars of irreplaceable wood from reading cheap. Brian does it without being asked because he's thinking about the finished wall, not the shortcut to get there. That's the difference between someone installing wood and someone building a wall.
This is exactly the kind of judgment that's hard to teach and essential to pass on. On a recent build, one of Brian's sons sheeted and rolled the black backing onto a wall — unglamorous prep work, the kind a hurried crew skips or does carelessly. Learning to take that invisible step seriously, to understand that the hidden layer is what makes the visible one look right, is how a young carpenter starts thinking like a builder instead of an installer. The lesson isn't about paint. It's about caring as much about what's hidden as what's seen. Passed down one wall at a time.
Related Resources — Reclaimed Wood Feature Guide
This construction guide is part of a full series on planning a reclaimed wood feature in the Inland Empire. The companion guides cover the rest:
-
How Much a Reclaimed Wood Accent Wall Costs — real numbers, including what the hidden layer contributes.
-
What Goes Wrong With Reclaimed Wood Walls — the install mistakes and material issues to avoid.
-
Authentic vs. Aged & Faux Reclaimed Wood — choosing the visible material itself.
-
Best Wood for Floating Shelves & Feature Walls — the species that mount on the hardware described here.
-
How to Hire a Finish Carpenter — making sure your contractor specifies the mounting method.
Frequently Asked Questions
What do you put behind a reclaimed wood wall?
Behind a reclaimed wood wall you typically put a solid substrate — a sheet of MDF or plywood — fastened to the studs, which the wood then attaches to and which controls how the finished wall reads. On rustic walls with irregular boards, that substrate is often painted a dark color, usually matte black, so any natural gap between aged planks reads as a shadow line instead of flashing bright drywall through the seam. The substrate also gives you solid backing to fasten into anywhere, rather than hunting for studs. On the Broken Twig project, the wall and ceiling tray were sheeted in MDF and painted flat black before a single barn board went up. What goes behind the wood is invisible in the finished room, but it's one of the decisions that most affects how good the wall looks.
Should you paint the wall black behind wood planks?
Yes — painting the backing black (or another dark color) behind wood planks is one of the smartest, cheapest moves you can make on a rustic reclaimed wood wall. Reclaimed boards are irregular, so a hairline gap between aged planks is part of the material. On a white or raw substrate, those gaps flash bright and cheapen the whole wall. On flat black, the same gap reads as a shadow line, like it was meant to be there. DIY reclaimed wood installers consistently report the same lesson: a darker surface behind the planks hides what shows through the seams. On the Broken Twig project, the matte black MDF backing went up first specifically to protect the look of the expensive wood. It costs a gallon of paint and makes a disproportionate difference.
Can you nail reclaimed wood directly to drywall?
You should not rely on nailing reclaimed wood directly to drywall, because drywall alone won't reliably hold the fasteners or the weight, and you'd be limited to fastening only where studs happen to fall. The better approach is to install a substrate — MDF or plywood — over the drywall and into the studs first, then fasten the wood to that solid backing. This gives you something dependable to nail into across the entire wall, supports the weight of the wood, and lets you paint the backing dark to hide gaps. For heavier elements like solid floating shelves, the mounting has to anchor into framing regardless. Construction adhesive plus nails into drywall might hold thin lightweight panels temporarily, but it's not how a finish carpenter builds a wall meant to last.
How do floating shelves hold so much weight?
Floating shelves hold weight because their concealed mounting hardware — typically heavy-duty steel rods or a steel bracket — anchors into the wall framing, and the shelf is bored to slide onto that hardware so the load transfers back into the structure. The shelf isn't held by the wall surface; it's held by steel anchored to studs or solid blocking behind the wall. A solid hardwood slab is then precision-bored so the rods slide deep inside it, leaving no visible bracket. The thickness of the shelf both conceals the hardware and resists sagging over the span. On the Broken Twig project, the 2-inch-thick live-edge walnut shelves were bored to slide onto concealed heavy-duty steel rods anchored into the wall — true floating shelves with no visible support. Drywall anchors alone can't do this; the load must reach framing.
Do you need furring strips for a wood accent wall?
Furring strips are useful for a wood accent wall when you need to create a level mounting plane, add an air gap, or fasten over an uneven or masonry surface, but they aren't always required if you're installing a solid substrate sheet instead. Furring strips are thin wood strips fastened to the wall at intervals, giving you consistent points to nail into and helping flatten a wall that isn't true. Some installers use them in place of a full substrate sheet; others use a full sheet of MDF or plywood for continuous backing and the freedom to fasten anywhere. The right choice depends on the wall condition and the look you're after. Both are legitimate; the key is having a planned, solid base rather than improvising into drywall.
Is MDF or plywood better for backing behind a wood wall?
For backing behind a wood wall, MDF is excellent when you want a smooth, flat surface to paint dark and the wall stays dry, while plywood is the better choice when you need stronger fastener holding, more moisture tolerance, or backing that will carry heavier loads. MDF is dense, perfectly flat, and takes paint beautifully — ideal for the matte-black backing trick on a rustic wall — but it's heavier, doesn't hold screws near edges as well, and dislikes moisture. Plywood is lighter for its strength, holds fasteners better, and tolerates humidity, making it the smarter pick behind shelves or in any space with moisture concerns. On the Broken Twig project, MDF was used for the painted backing behind the decorative barn wood. Match the substrate to the job: MDF for a flat painted base, plywood where strength or moisture matters.
Let's Talk About Your Project
Planning a reclaimed wood wall or floating shelves and want to be sure the hidden layer is done right? That's exactly the kind of detail we plan before anything goes up. Head to our contact page, fill out the form, describe your space, and upload any inspiration photos. We'll walk you through the substrate, the backing, and the mounting before a single visible board is committed.
We serve Norco, Corona, Eastvale, Riverside, Temecula, Murrieta, Menifee, Perris, and the wider Inland Empire. Follow our latest work on social media, and reach out whenever you're ready.
951-338-8058 | brian@hsconstruct.com | hsconstruct.com | CSLB #1123738
More Than Just Reclaimed Wood Walls
Getting the hidden layer right is part of how every custom feature we build lasts. Brian and his sons have been finish carpenters since 1991, which means every room in your home is fair game.
If your space needs more than that, here's what else we build:
-
Kitchen and bathroom remodels — full custom cabinetry, tile work, and finish carpentry from demo to done
-
Coffered ceilings — grid beam systems that add architectural depth to any room, sized and proportioned to the space
-
Wainscoting and wall paneling — classic raised panel, flat panel, board-and-batten, and shiplap applications
-
Reclaimed wood accents — feature walls, fireplace surrounds, and detail work using salvaged material with real character
-
Beam wraps — hollow wood wraps that give exposed beams the look of solid timber without the structural engineering
-
Crown molding, baseboards, and trim carpentry — the details that make a house feel finished, from a single room to a whole home
-
Cased openings and interior door replacements — clean transitions between spaces that most contractors overlook
-
Custom built-in entertainment walls and bookshelves — designed by hand, built in the shop, installed to last
Wood, proportion, and rooms that feel right — that's what we do.
hsconstruct.com
About the Author
Brian Holland is the owner and lead carpenter of Holland & Sons Construction, a family-run finish carpentry and general contracting company serving Riverside County and the Inland Empire since 1991. He entered the trade at 17, learned on the job, and has spent 35 years building the kind of work that makes rooms feel right — often before a homeowner can articulate why. His sons now apprentice alongside him on every project. Holland & Sons is based in Perris, CA and licensed by the CSLB (#1123738).
This guide is part of our accent walls series.
Learn more about Accent WallsHave a project in mind? Let's start a conversation.
Tell us what you are thinking about and we will give you a straight answer about scope, timeline, and investment.
Start a Conversation